Showing posts with label chocolate. Show all posts

Tuesday, 28 April 2015

No-Bake Oaty Peanut Butter Squares

These squares are my favourite things to make when I fancy some homemade treats but can't be bothered to switch on the oven and create lots of washing up, or when I want something yummy that's not as heavy as cake. They really couldn't be easier to whip up and the salty crunchiness of the peanut butter goes amazingly well with the sweet honey and chocolate chips.

Although I wouldn't call these creations 'healthy', they're certainly a bit less sinful than a doorstop of frosted cake or a big gooey chocolate cookie. Having said that, they're so ridiculously moreish that I find myself unable to stop at just one and could happily devour an entire batch in one sitting - and that definitely doesn't constitute a guilt-free snack!


INGREDIENTS
  • 300g oats
  • 240g crunchy peanut butter
  • 120g honey
  • 60g dark chocolate chips
  • Pinch of salt
METHOD
  1. Line a rectangular cake tin with baking parchment or clingfilm.
  2. Place the peanut butter and honey in a saucepan and stir on a low heat until smooth and melted together.
  3. Pour in the oats, chocolate chips and salt and mix with a wooden spoon until all the oats are covered.
  4. Pour the mixture into the prepared tin and press down with the wooden spoon to form an even layer.
  5. Place in the fridge to set for a minimum of 1 hour before slicing into squares with a sharp knife.

Tuesday, 14 April 2015

Chocolate Teacake Cake

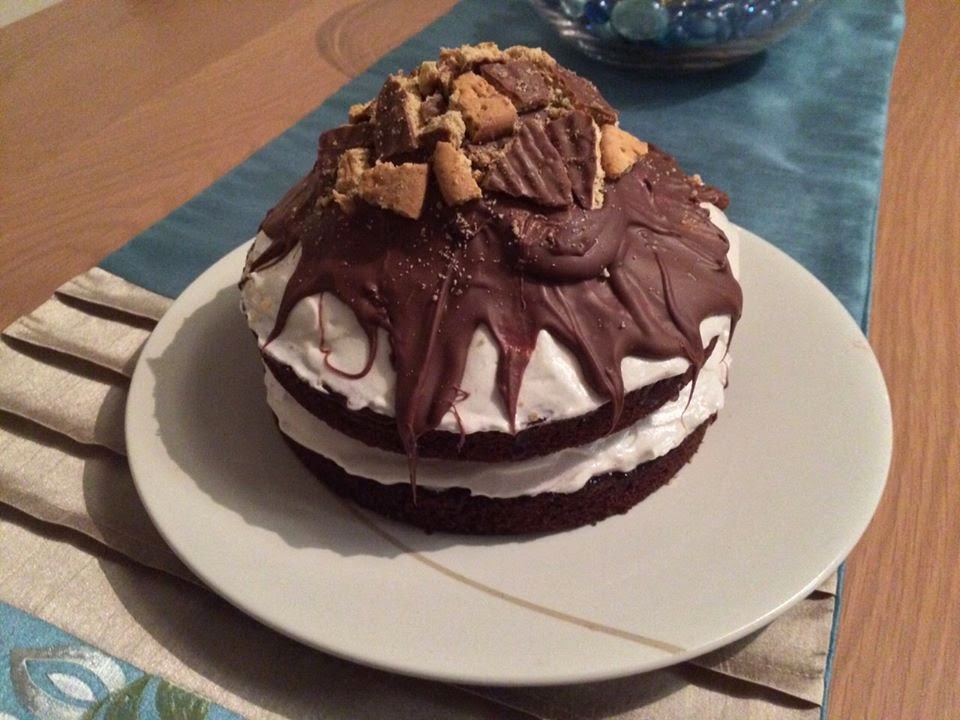
Before Easter I was struck down with gastroentiritis and it was an utterly horrendous experience. Crippling stomach pains and the inability to eat anything but dry crackers and ginger nut biscuits for over a week meant I was fantasising about the day I could finally stuff my face with indulgent food again, and I swore I'd treat myself by making a big decadent cake when I was better. Luckily, I recovered in time for the Easter weekend and decided to set myself the challenge of baking something chocolatey that didn't involve Mini Eggs or Creme Eggs. Don't get me wrong, I LOVE Mini Eggs and Creme Eggs but I thought it'd be fun to try something outside-the-box. The result was a creation inspired by one of my favourite treats, chocolate teacakes, with their heavenly combination of fluffy marshmallow filling, strawberry jam, biscuit base and a crisp chocolate coating. The flavours and textures transfer really well into cake form and it was a lot of fun to make, especially the mountain of meringue frosting topped with a chocolate shell!

Freezing the marshmallow frosting for five minutes before pouring on the melted chocolate is a great tip I picked up from a recipe for hi-hat cupcakes and it really works! Make sure you don't omit this step or you'll end up with a runny, melty mess. Also, as I mentioned in my Neapolitan Cake post, although beating egg white with icing sugar makes for a deliciously marshmallow-like frosting, it doesn't last well and will begin to shrink after a couple of days. The cake will still be delicious but it won't look as good!


INGREDIENTS

For the cake:
  • 225g self-raising flour
  • 225g caster/granulated sugar
  • 225g butter/margarine
  • 4 eggs
  • 2 heaped tbsp cocoa powder
  • 2 tsp vanilla extract
For the frosting/filling/topping:
  • 2 egg whites
  • 4 tbsp icing sugar
  • 2 tsp vanilla extract
  • 2 tsp golden syrup
  • 0.5 tsp cream of tartar (optional but helps to stabilise the mixture)
  • 5 tbsp (approx.) strawberry jam
  • 100g milk chocolate
  • 3-4 milk chocolate or plain digestive biscuits

METHOD

For the cake:
  1. Pre-heat the oven to 180 degrees C and and line two round baking tins with parchment paper.
  2. Whisk the butter/margarine and sugar together in a large mixing bowl until pale then whisk in the eggs.
  3. Fold in the flour, cocoa powder and vanilla extract until a batter of a soft dropping consistency has formed.
  4. Pour the mixture into the prepared cake tins then pop in the oven and bake for around 15-20 minutes until a cocktail stick inserted into the sponges comes out clean.
  5. When baked, leave the cakes to cool on a wire rack before turning them out of the tins. At this stage the sponges can be frozen for decorating at a later date if you wish.
For the frosting/filling/topping:
  1. Spread the strawberry jam generously across the top of one of the cooled sponges.
  2. Separate the egg whites into a clean bowl and whisk with the vanilla extract, golden syrup and cream of tartar, while adding the icing sugar a few teaspoons at a time, until stiff peaks form - you should ideally do this for a minimum of 7-10 minutes.
  3. Spread about a third of the frosting on top of the jam-covered sponge using a palette knife then sandwich the other sponge on top. 
  4. Spread the rest of the frosting on top of the cake to form a mountain - pile it up as high as possible - then place in the freezer for about 5 minutes until it's fairly firm.
  5. While the cake is in the freezer, place the chocolate in a heatproof bowl and melt over a pan of hot water or in the microwave in blasts of 30 seconds until smooth.
  6. Remove the cake from the freezer and immediately pour the melted chocolate over the top of the frosting mountain so that it drizzles down the sides. 
  7. Crush the digestive biscuits into chunks by hand and place on top of the chocolate covering then leave to set before serving.

Tuesday, 10 March 2015

Neapolitan Cake

I've been sticking to lower fat/sugar bakes for the last couple of months as part of my new year (mostly) healthy eating regime but last weekend while back home at my parents' I was desperate to just go nuts and make a proper double decker sponge with lashings of scrummy frosting. I've wanted to try a tri-colour Neapolitan ice cream inspired cake, with layers of chocolate, vanilla and strawberry, for a while so this was the perfect time to give it a go. I'm really pleased with how it turned out and think it looks really pretty and cheery!

The frosting I used in this recipe is just egg white beaten with icing sugar plus flavouring and food colouring and this makes for a lovely light, almost marshmallow-like texture which is less sickly than buttercream. However, a word of warning: it starts to shrink and evaporate after 24 hours or so so if you're making the cake in advance I'd recommend using buttercream icing instead as it will last much longer.

Side note: A lot of my previous cake recipes on here have listed the quantities in ounces but I've decided to start using metric only from now on in order to be consistent.


INGREDIENTS

For the cake:
  • 225g self-rasing flour
  • 225g caster/granulated sugar
  • 225g butter/margarine
  • 4 eggs
  • 2 heaped tbsp cocoa powder
  • 2 tsp vanilla extract
  • 50g chocolate chips (optional but very yummy)
For the icing/jam filling:
  • 1 egg white
  • 2 tbsp icing sugar
  • 1 tsp strawberry extract
  • Few drops of red food colouring
  • Handful coloured vermicelli
  • 4 tbsp (approx.) strawberry jam
METHOD

For the cake:
  1. Pre-heat the oven to 180 degrees C and line two round baking tins with parchment paper.
  2. Whisk the butter/margarine and sugar together in a large mixing bowl until pale then whisk in the eggs.
  3. Fold in the flour and vanilla extract until a batter of a soft dropping consistency has formed.
  4. Separate half of the mixture into a second bowl and and fold in the cocoa powder and chocolate chips.
  5. Pour the mixtures one each into the two cake tins.
  6. Pop in the oven and bake for about 15-20 minutes until a cocktail stick inserted into the sponge comes out clean.
  7. When baked, place on a wire rack and leave to cool before turning the cakes out of the tins. At this stage the cakes can be frozen for decorating at a later date if you wish.
For the icing/filling:
  1. Spread the strawberry jam onto the top of the cooled chocolate sponge and sandwich the vanilla sponge on top.
  2. Separate the egg white into a clean bowl and whisk with the strawberry extract until stiff peaks form while adding the icing sugar a few teaspoons at a time.
  3. Add the food colouring a couple of drops at a time and whisk again until you have your desired shade of pink.
  4. Spread the icing over the top of the cake using a palette knife - tap roughly with the palette knife to achieve the fluffy effect in the photo - and then sprinkle with vermicelli as a colourful finishing touch.

Tuesday, 3 March 2015

Fabulous Biscotti

I first made these lovely crisp biccies, which go perfectly with a cuppa, with raisins and dark chocolate chips using a brilliant recipe from the Hairy Dieters as inspiration when on the hunt for lower fat/calorie bakes that still delivered a sweet hit. They turned out fantastically and have since become a bit of a signature bake of mine. I love how easy and versatile this recipe is - once you've got the basic biscotti dough you can add pretty much anything you want for flavour; chocolate, spices, citrus zest, dried fruit, nuts...the list is endless!

The original version made with orange zest, dark chocolate chips and dried cranberries weighed in at only 53 calories a piece so, although I can't give an exact estimate when other ingredients are added, the chances are they're still reasonably sin-free provided you don't go too mad with the sugary extras!

I know traditionally biscotti is made with almonds but I always use almond extract as I love the delicate flavour it gives. By all means use whole almonds if you prefer though.


I made these cherry and white chocolate ones for Valentine's Day :)

INGREDIENTS - makes approx. 20 pieces
  • 180g self-raising flour
  • 80g caster sugar
  • 1 egg + 1 egg white*
  • 40g white chocolate chips (or other chocolate/ingredient of choice)
  • 40g glace cherries, chopped into chocolate chip sized pieces (or other dried fruit/ingredient of choice)
  • 1 tsp almond extract
  • 1 tsp vanilla extract
  • 0.5 tsp baking powder
METHOD
  1. Pre-heat the oven to 180 degrees C and line a large flat baking tray with parchment paper.
  2. Mix the dry ingredients together in a large bowl then add the chocolate chips, cherry pieces and almond extract.
  3. Beat the egg and egg white together along with the vanilla extract for around 1 minute and pour into the mixture.
  4. Mix with a wooden spoon and then your hands until the ingredients come together to form a stiff dough. If it's too sticky add a little more flour and if it's too dry and crumbly add a splash of milk.
  5. Roll the dough into a sausage shape about 25-30cm long and place on the baking tray then gently flatten it until it's about 2cm tall.
  6. Place in the oven for around 25-30 minutes until the dough is firm with a crust but still fairly pale.
  7. Remove from the oven and reduce the heat to 140 degrees C then allow the dough to cool for around 10 minutes before sawing into pieces about 2cm thick using a serrated knife.
  8. Place the biscuits back on the baking tray and cook for a further 25 minutes or until lightly browned then leave to cool before enjoying with tea or coffee.
*Please don't throw the spare yolk away if at all possible! It can be used in homemade burgers, Welsh rarebit or eggy bread, among other things (sorry, I just really hate waste!)

Edit: I made these decadent double chocolate biscotti for my friend's birthday by following the above recipe but omitting the almond extract, replacing two heaped tablespoons of flour with cocoa powder and substituting dark chocolate chips in place of the cherries:


Saturday, 20 December 2014

Chocolate Gingerbread Cake

WARNING: this stuff is highly addictive!! Seriously, I made a batch with the aim of taking half into university to share with my classmates but it somehow all disappeared in a number of freak scoffing accidents before I had the chance...

The recipe below is adapted from one found in an old winter issue of Good Food magazine - I thought the original batter lacked a chocolatey flavour and didn't really taste much different from normal gingerbread cake so I added cocoa to the mix which resulted in the perfect marriage of chocolate and spice. I also cut down the amount of treacle and syrup used as I felt the previous quantities were a bit excessive.

This cake is definitely my new festive favourite as it's so deliciously moist, smells incredible and is super simple to make. It also keeps really well and, if anything, tastes better after a couple of days (if you can make it last that long...)


I finished this batch off with some sprinkly chocolate rings from Aldi.

INGREDIENTS - makes approx. 12 large squares

  • 9 oz self-raising flour
  • 5.5 oz butter/margarine
  • 4 oz dark brown sugar
  • 4 oz black treacle
  • 4 oz golden syrup
  • 4 oz milk or dark chocolate
  • 2 tbsp cocoa powder
  • 1 tsp ground ginger
  • 2 tsp ground cinnamon
  • 1 tsp mixed spice
  • 5 fl oz milk
METHOD
  1. Pre-heat the oven to 180 degrees C and line a rectangular cake tin with baking parchment.
  2. Place the butter/margarine, sugar, treacle, syrup and spices into a heatproof bowl and melt in the microwave until smooth or melt in a pan over the hob.
  3. Roughly chop the chocolate into small pieces and place in another heatproof bowl then melt in the microwave in blasts of 30 seconds-1 minute or over a pan of hot water. 
  4. Stir the melted chocolate into the butter mixture then fold in the flour, cocoa powder and milk.
  5. Pour the mixture into the cake tin then bake for 20-30 minutes until a skewer inserted into the cake comes out clean.
  6. Transfer (with the baking parchment) onto a wire rack to cool then cut into squares with a sharp knife. Top with festive decorations of your choice if you wish.

Friday, 19 December 2014

Festive Rocky Road

I've not been great at keeping my blog updated over the last few months due to being busy with uni but now we're officially into the festive season it'd be wrong not to post some recipes! Being a loan-less student in London means money is pretty tight so I've been doing Christmas on a budget this year by creating as many homemade edible/crafty gifts as time and ability allows. This snowy white rocky road is a twist on the traditional kind and so ridiculously easy and cheap to make. The ruby red glace cherries look beautifully festive and the spicy ginger of the biscuits contrasts wonderfully with the creamy white chocolate.

You could also add nuts (e.g. pistachios or walnuts) or experiment with other goodies like dried cranberries for an equally authentic yuletide taste.


INGREDIENTS - makes approx. 15-18 squares
  • 500g white chocolate
  • 150g ginger nut biscuits
  • 200g glace cherry halves (1 standard tub)
  • 2 handfuls mini white marshmallows
METHOD
  1. Line a standard rectangular cake tin with baking parchment.
  2. Melt the chocolate in a heatproof bowl in blasts of 30 seconds in the microwave (no longer or it'll seize!) or over a pan of hot water.
  3. Roughly break the ginger nuts up by hand into pieces no bigger than a 50p piece and add to the chocolate then stir in the glace cherries and marshmallows until thoroughly coated.
  4. Pour the mixture into the cake tin then allow to set in the fridge for a minimum of 2 hours before cutting into squares with a sharp knife.

Friday, 28 February 2014

Belgian Speculoo (Caramelised Biscuit) Cupcakes

I thought it was about time I made my first blog post of 2014!

In October last year I went for a lovely long weekend in Bruges with one of my best friends and, in between stuffing our faces with the heavenly chocolate and fruit beer, we found ourselves sampling delicious golden caramel-flavoured 'Speculoo' spread every morning with breakfast in the hotel. This is a peanut butter style spread that's made from 'Speculoo' biscuits which, we later found out from the distinctive red and white packaging, can be bought here in the UK under the name 'Lotus Caramelized Biscuits'. Just recently, the spread has also become available to buy in the supermarkets over here so it went without saying that I needed to cake-ify it somehow! And here's the meltingly moreish result, topped off with Belgian chocolate chips for the ultimate Bruges experience :)

(Sorry for the rather pants photo, took it on my phone...)

INGREDIENTS - makes approx. 12 medium-large cakes

For the cakes:
  • 6 oz self-raising flour
  • 4 oz brown sugar
  • 2 oz caster sugar
  • 6 oz butter/margarine
  • 3 eggs
  • 1 tsp vanilla extract
  • 0.5 tsp baking powder
  • 1 tsp Lakeland buttery caramel flavouring (optional but stunningly delicious and aromatic!)
For the icing (apologies if measurements are a bit off here, made it up as I went along):
  • 3 tbsp butter (unsalted if preferred)
  • 4 tsbp Lotus Caramelized Biscuit spread
  • 4 tbsp icing sugar
  • 1 tsp vanilla extract
  • 3 tsp milk
  • Few drops of Lakeland buttery caramel flavouring (again, optional but scrummy!)
  • Handful of Belgian chocolate chips
METHOD

For the cakes:
  1. Line a baking tray with 12 paper cases.
  2. Whisk the margarine/butter and both lots of sugar together in a mixing bowl then whisk in the eggs.
  3. Fold in the flour, baking powder, vanilla extract and caramel flavouring until a batter of a soft dropping consistency has formed.
  4. Drop the mixture into the paper cases using a teaspoon until they're each about two thirds full.
  5. Pop in the oven and bake at 180 degrees C for about 12-15 minutes until a cocktail stick inserted into the sponge comes out clean.
  6. When baked, place on a wire rack and leave to cool. At this stage the cakes can be frozen for decorating at a later stage if you wish.
For the icing:
  1. Stir/whisk the butter, Lotus spread, vanilla extract, caramel flavouring and icing sugar together in a bowl until well combined, while gradually adding the milk to loosen the mixture until it's of a spreadable consistency. If it's too thick, add more milk and if it's too runny, add more icing sugar.
  2. Spread onto the cakes using a palette knife or pipe on using the nozzle of your choice.
  3. Top each cake with a few Belgian chocolate chips.

Monday, 9 December 2013

Hot Chocolate Biscuits

My original attempt at hot chocolate biscuits were a sub-par batch of dry, cakey chocolate cookies from a recipe I found online so I went back to the drawing board and invented my own version which keeps the hot chocolate powder, generous chocolate chunks and gooey marshmallow but uses icing sugar in place of caster sugar and plain flour instead of self-raising. This creates a more even and less puffed-up biscuit without making them hard and brittle.

The combination of chunky milk chocolate pieces and chewy marshmallow inside a rich, dark cocoa biscuit makes for a delicious taste and texture. For further hot chocolatey decadence, sandwich two biscuits together with Marshmallow Fluff - scrumptious!

Note: the large chocolate chunks in these cookies means the dough will be fairly thick and slightly uneven when rolled out and the final result will be a little bumpy with oozy marshmallow patches, so I'd advise using a simple cutter rather than an intricately shaped one for this recipe.


INGREDIENTS - makes approx. 20 biscuits depending on size of cutter
  • 8 oz plain flour
  • 1 oz cocoa
  • 1 oz hot chocolate powder
  • 1 tsp Horlicks (or other malt drink powder)
  • 1 oz icing sugar
  • 6 oz margarine/butter
  • 1 tsp vanilla extract
  • 4 oz milk chocolate chips or cut-up chunks
  • Handful of marshmallows snipped into small bits
  • 0.5 tbsp instant ground coffee dissolved in approx. 0.5 tbsp boiling water
METHOD
  1. Boil the kettle and pour about half a tbsp water over half a tbsp instant ground coffee and set aside.
  2. Whisk the margarine/butter and icing sugar together until combined.
  3. Add the flour, cocoa, hot chocolate powder, Horlicks, chocolate chunks and bits of marshmallow and mix briefly.
  4. Add the vanilla extract and prepared coffee then use your hands to squash the mixture together to form a ball of dough. If it's too sticky, add a bit more flour.
  5. Wrap the dough in clingfilm or a freezer bag and chill in the fridge for about 15-20 minutes.
  6. Place the ball of dough onto a large clean sheet of baking parchment then place another sheet on top and roll out with a rolling pin until about 1.5cm thick, depending on the size of the chocolate pieces (alternatively, you could roll the dough out on a floured surface but this may spoil the colour of the biscuits a bit).
  7. Cut out as many biscuits as possible using your cutter of choice (I used a flower shape) and place onto a parchment-lined baking tray then squish the offcuts of dough together, re-roll and repeat the process until all the dough is used up.
  8. Pop in the oven and bake at 180 degrees C for about 8-10 minutes then transfer onto a wire rack. This is the part where I'd normally say leave to cool but don't leave them too long as they're delicious while still warm from the oven - just beware of molten marshmallow!

Sunday, 8 December 2013

Red Velvet Star Biscuits

I haven't updated my little blog in a while due to being busy but now we've officially entered the most wonderful time of the year for cooking I've been squeezing in lots of festive baking.

These decadent biccies have got to be one of my all time favourite recipes and more than make up for my first (and so far only) attempt at red velvet cake being a disaster. They contain quite a large amount of red gel colouring and icing sugar, plus buttermilk and egg, so they're not the cheapest cookies to make but they look and taste fantastic and are a perfect luxurious treat for Christmas, Valentine's Day or any other special occasion, or as a gift. I wish I'd taken photo which showed their beautiful dark red colour better as it makes the cookies look very distinctive even without decoration, although I added Dr Oetker Gold Shimmer Spray for an extra festive sparkly sheen. These would also be delicious sandwiched together with some cream cheese frosting for an even more authentic red velvet experience.

If, like me, you don't want to buy buttermilk (it's not very widely available here in the UK), I found a great tip online showing you how to make your own by simply adding a dash of white wine vinegar or lemon juice to milk and leaving it to curdle for a few minutes. Et voila - bona fide red velvety goodness in biscuit form!

This recipe is an adapted version of an American one I found here: http://www.sweetsugarbelle.com/2012/02/red-velvet-roll-outs-recipe/


INGREDIENTS - makes approx. 40 biscuits depending on size of cutter

  • 4 oz butter/margarine
  • 6 oz icing sugar
  • 9 oz plain flour
  • 0.5 egg
  • 2 oz cocoa
  • 3 tsp buttermilk (or 3 tsp milk + 1 tsp white wine vinegar or lemon juice)
  • 1.5 tbsp vanilla extract
  • 0.5 tsp baking powder
  • 1.5 tbsp red gel food colouring (NOT the liquid kind as this won't work!)
  • Dr Oetker Gold Shimmer Spray (optional)
METHOD
  1. If making buttermilk as outlined above, pour the white wine vinegar or lemon juice into the milk and set aside for a few minutes.
  2. Whisk the butter/margarine and icing sugar until combined.
  3. Stir in the egg, vanilla extract, buttermilk then add the flour, cocoa and baking powder and mix briefly.
  4. Add the gel food colouring a teaspoon at a time and mix until the mixture turns a deep blood-like red shade then squash together with your hands to form a ball of dough. If it's too sticky, add some more flour.
  5. Wrap the dough in clingfilm or a freezer bag and chill in the fridge for about 15-20 minutes until fairly firm.
  6. Place the ball of dough on a large clean sheet of baking parchment then place another sheet over the top and roll out with a rolling pin until about 1cm thick.*
  7. Cut out as many biscuits as possible with your cookie cutter of choice (I used a star shape) and place onto a parchment-lined baking tray (they don't spread out much when cooking so they can be placed fairly close together). Squish the offcuts of dough together and re-roll and repeat the process until all the dough is used up.
  8. Pop in the oven and bake at 180 degrees C for about 8 minutes then transfer onto a wire rack and leave to cool.
  9. If you want a gold sheen effect as in the photo, hold the can about 10cm away from the biscuits and spray each one with the Shimmer Spray then leave to dry.
*You could just sprinkle flour onto the surface to prevent the rolling pin sticking but this ruins the bold colour of the dough when baking.


Sunday, 1 September 2013

Best Ever Jack Daniel's Brownies

Oh em gee. Seriously...there are no words to describe how utterly delicious these decadent chunks of chocolate heaven are! Just writing about them is making me crave one...

My previous attempts at brownies were pleasant enough but always seemed more like a moist chocolate cake and never turned out anything like bakery bought ones with their glorious gooey centres and thin top crusts. Then a friend from work sent me her recipe that used oil rather than butter and this, without a doubt, made all the difference in creating the perfect texture. Adding the Jack Daniel's whiskey was my little twist and the end result is simply sublime and devastatingly addictive. Milk cooking chocolate gave a lovely fudgy flavour but dark chocolate would also work if you prefer.

Please don't let the wrinkly, sunken appearance of the brownies when they come out of the oven put you off - I promise you the taste will be amazing!!


(Apologies for the rubbish photo, took it on my BlackBerry...)

INGREDIENTS
  • 215g granulated/caster sugar
  • 2 eggs
  • 70g self-raising flour
  • 120ml cooking oil
  • 150g milk cooking chocolate
  • 4 tbsp cocoa powder
  • 1 tbsp Jack Daniel's whiskey
  • 3/4 tbsp vanilla extract
METHOD
  • Grease the baking tin with margarine/butter or line with baking parchment.
  • Briefly whisk the sugar, eggs, oil and vanilla extract together in a large mixing bowl.
  • Chop the chocolate into small chunks and melt in a heatproof bowl over a saucepan of hot water or place in the microwave and heat in blasts of about 1 minute until smooth, then pour into the mixing bowl.
  • Fold the flour, cocoa and Jack Daniel's into the mixture and pour into the lined tin.
  • Pop in the oven and bake at 180 degrees C for about 20 minutes until a cocktail stick inserted into the brownies comes out pretty much clean then leave to cool.
  • Cut the brownies into squares using a sharp knife and devour while moaning pleasurably. Easy peasy!

Sunday, 30 June 2013

Golden Caramac Cupcakes

Seriously, who doesn't love Caramac?? I'm so glad you can still buy these deliciously retro and unique golden caramel flavoured chocolate bars in most shops. This recipe is so easy but great if you want something a bit different from normal chocolate cupcakes, and the mere smell will have people salivating in anticipation! Adding half dark brown sugar to the batter is a simple twist on a regular cupcake but the result is a divinely butterscotchy flavour which really compliments the Caramac frosting. The creation of these babies coincided with Bargain Baking Find of the Year, courtesy of my mum - she picked up a can of Dr Oetker's amazing Golden Shimmer Spray for 49p instead of a whopping £3.99 just because the main cap was missing! I don't think I could justify paying full whack for it but the metallic sheen it creates is just fantastic and perfect for this recipe, although the cakes are just as delicious without it.


INGREDIENTS - makes approx. 12

For the cakes:
  • 4 oz self-raising flour
  • 2 oz caster sugar
  • 2 oz dark brown sugar (sifted if preferred)
  • 4 oz margarine/butter
  • 2 eggs
  • 1 tsp vanilla extract
  • 1/4 tsp baking powder
For the icing:
  • 4 oz butter (unsalted if preferred)
  • 8 oz icing sugar
  • 3 30g Caramac bars
  • Dr Oetker Gold Shimmer Spray (optional)
METHOD

For the cakes:
  1. Line a baking tray with 12 paper cases.
  2. Whisk the margarine/butter and both lots of sugar* together in a mixing bowl then whisk in the eggs.
  3. Fold in the flour, baking powder and vanilla extract until a batter of a soft dropping consistency has formed.
  4. Drop the mixture into the paper cases using a teaspoon until they're each about two thirds full.
  5. Pop in the oven and bake at 180 degrees C for about 12-15 minutes until a cocktail stick inserted into the sponge comes out clean.
  6. When baked, place on a wire rack and leave to cool. At this stage the cakes can be frozen for decorating at a later stage if you wish.
For the icing:
  1. Break one of the Caramac bars up into a heatproof bowl and place over a saucepan of simmering water without letting the bottom of the bowl touch the water, or heat on short bursts of LOW heat in the microwave, until completely melted.
  2. Add the butter and stir/whisk while gradually adding the icing sugar until a thick, fluffy mixture has formed. If it's too runny, add some more icing sugar.
  3. Spread onto the cakes using a palette knife or pipe on using the nozzle of your choice, then spray with the gold Shimmer Spray (I found this works best when keeping the can about 10 ins away from the cake).
  4. Carefully break or cut the remaining two Caramac bars into 12 rectangular sections and push one onto the top of each cake as a neat finishing touch.
* You may find that the dark brown sugar stays a bit lumpy; I actually prefer it like this as biting into melty specks of it in the baked cupcake is rather heavenly IMO, but if you want a more even mixture sieve the brown sugar before adding it.

Wednesday, 29 May 2013

Sinfully Easy Lindor Choc Cheesecake Cupcakes with Melty Centres

Last Christmas I somehow ended up with three boxes of Lindor chocolates; one of each of the white, milk and cookies & cream varieties to be precise. Now, I am most certainly NOT complaining as they are divine but, amidst all the other gazillions of truffles, mints, posh biscuits and other choccy treats myself and my family acquired between us during the festive season (there's still several boxes in the cupboard even now at the end of May, no joke) I thought I'd try and put some of them to use in my baking. Or rather, I thought I'd use the milk and white chocolate ones in my baking; the cookies & cream ones are such amazingly heavenly little balls of sweet, creamy loveliness that I have them stashed away in an undisclosed location for me to savour as they are too good even to share! Sorry. Not sorry. Anyway, one thing I found is that Lindor balls actually melt surprisingly well, even the white ones (provided you chop them up) so this uber decadent recipe really is sinfully easy.

Obviously if you don't want to splash out and use Lindor chocolates, these cakes would work fine with most other kinds, but I found them an unashamedly indulgent and sophisticated change to the bog-standard cooking chocolate taste, and you really can't beat Lindor for creaminess so they work fantastically in the gooey melty surprise centres.

I took a batch of these into work on my birthday back in January and they seemed to vanish in a puff of smoke - you can't go wrong with chocolate and cheesecake afterall, even when there are avid new year dieters about...


INGREDIENTS - makes approx. 12-15

For the cakes:
  • 4 oz self-raising flour
  • 4 oz caster sugar
  • 4 oz margarine/butter
  • 2 eggs
  • 2 oz cocoa powder
  • 1 tbsp strong instant coffee, diluted in hot water
  • 1/2 tsp baking powder
  • 1 tsp vanilla extract
For the melty filling/icing:
  • 5 (approx.) milk Lindor chocolates
  • 5 (approx.) white Lindor chocolates
  • 4 oz cream cheese (at room temperature, full-fat works best)

METHOD

For the cakes (inc. filling):
  1. Line a baking tray with 12 paper cake cases and boil the kettle.
  2. Whisk the margarine/butter together in a large mixing bowl until pale then whisk in the eggs.
  3. Fold in the flour, baking powder and vanilla extract until a batter of a soft dropping consistency has formed.
  4. Drop the mixture into half of the paper cases using a teaspoon until they're each about half full.
  5. Roughly chop two of the white Lindors into thirds using a sharp knife (and being careful not to ping them off the worktop...) and place a third on top of the mixture in each filled case, then top up each case with cake batter until they're about two thirds full.
  6. Stir a tablespoon of instant coffee into about two tablespoons of boiling water until the granules have all dissolved then pour into the remaining cake batter*. Then make a cup of tea with the leftover boiled water (well, it'd be wrong to put the kettle on and not have a cuppa, wouldn't it?!)
  7. Fold in the cocoa powder then drop the mixture into the remaining paper cases using a teaspoon until they're each about half full, then repeat step 5 but this time with two milk chocolate Lindors.
  8. Pop in the oven and bake at 180 degrees C for about 12-15 minutes until a cocktail stick inserted into the sponge comes out clean.
  9. When baked, place on a wire rack and leave to cool. At this stage the cakes can be frozen for decorating at a later date if you wish.

For the icing:
  1. Chop the remaining Lindors into small pieces and place the white chocolate ones into a heatproof bowl. Leave some of the flaky chocolate crumbs on the chopping board as these can be used to decorate the cakes at the end. 
  2. Place the bowl over a saucepan of hot water without letting the bottom touch the water and stir occasionally, or heat in short bursts of LOW heat in the microwave (this is important - don't put the white chocolate on a high heat for long periods or it will seize and turn lumpy and horrible), until completely melted.
  3. Place half of the cream cheese into a separate bowl and stir/whisk while pouring in the melted chocolate until a smooth, spreadable icing has formed. Work quickly as the chocolate will begin to set quite rapidly. If the mixture is excessively runny, add some icing sugar.
  4. Spread the icing onto the cooled vanilla cupcakes using a palette knife.
  5. Repeat steps 1 to 4 but this time with the milk chocolate Lindors and cupcakes.
  6. Sprinkle the remaining milk chocolate crumbs onto the white chocolate cakes and vice versa to decorate. Then grab one and devour it while you still can.
*Yes, this really does enhance the chocolatey flavour of the sponge, it's no myth! And I promise it won't make the cakes taste of coffee (this coming from a coffee hater, so trust me).

Sunday, 19 May 2013

Low Sugar Chocolate Mud Icing

Unfortunately my dad has diabetes and is therefore unable to consume my myriad teeth-rottingly sweet baked goods in large quantities. The rest of my family are fairly health-conscious too so I came up with this delicious and simple alternative to sugary buttercream using just cream cheese and dark chocolate with a high cocoa content. I've called it 'mud' because of its colour and thick, chunky consistency! Obviously if you're topping standard vanilla or chocolate sponges with it they can hardly be classified as super healthy, and there's still quite a high fat content, but it does mean a small cupcake can be enjoyed with a bit less guilt if you're watching your sugar intake without going overboard with the artifical sweetener, and the strong flavour means a little goes a long way. Generally I'm not a fan of dark chocolate containing a high percentage of cocoa myself but the slight bitterness of the icing was offset really nicely with the light sponge, and the vanilla cereal stars make very cute decorations!

There are various reduced-sugar cake recipes available online that this could be paired with. Remember: the higher the cocoa content percentage, the less sugary the chocolate but the more bitter the taste.

DISCLAIMER: I'm not a health or nutrition expert so try at your own risk!

I ran out of icing when I made the cakes in the photo above so the three on the right have diabetic pineapple jam in instead :)

INGREDIENTS - to ice approx. 12 cupcakes
  • 2 oz high-cocoa chocolate (minimum 60%), roughly chopped
  • 5 oz cream cheese (at room temperature, full-fat works best)
  • Handful of vanilla flavour star-shaped cereal (available in Tesco last time I checked)
METHOD
  1. Melt the chocolate in a heatproof bowl over a saucepan of boiling water without letting the bottom of the bowl touch the water and stir occasionally, or place in the microwave and blast on low heat in short bursts until completely melted.
  2. Place the cream cheese in a separate bowl and gradually pour in the melted chocolate while stirring until a smooth, spreadable mixture has formed.
  3. Spread the icing onto each cupcake using a palette knife - make sure you work quickly as it sets very rapidly - then top with a few vanilla cereal stars if desired.
Edit: Here are some I made for my dad for Father's Day, topped with crushed sugar-free Werther's Originals :)