Showing posts with label cake. Show all posts

Thursday, 21 May 2015

Banana Toffee Cake with Brown Sugar Buttercream

As a keen and frequent baker, I'm not quite sure why I'd never made banana bread/cake before as I love bananas and it's pretty much a failsafe creation. In fact, it almost seems to be a rite of passage recipe for those who begin to pursue an interest in baking. Anyway, when the time came to make a cake for my mum and dad's joint birthday celebrations back in April, I wanted to make something different that I hadn't tried before which would be indulgent but not too complicated. I decided to do a banana cake but with added toffee flavouring, and paired with a brown sugar buttercream and chopped up Caramac and Chomp bars for extra celebration-appropriate banoffee decadence.

I found that the brown sugar buttercream was a bit looser than normal frosting but if you need it to be stiffer just add in some extra icing sugar.


INGREDIENTS

For the cake:
  • 225g self-raising flour
  • 100g granulated/caster sugar
  • 90g dark brown sugar
  • 225g butter/margarine
  • 2 ripe/over-ripe bananas, peeled and mashed
  • 1 tsp vanilla extract
  • 1 tsp Lakeland buttery caramel flavouring (optional but delicious)
  • 0.5 tsp baking powder
For the buttercream/topping:
  • 100g butter
  • 100g dark brown sugar + a few pinches for sprinkling
  • 100g icing sugar
  • Few drops of Lakeland buttery caramel flavouring (again, optional but so good!)
  • 2 Chomp bars (or other toffee/caramel chocolate)
  • 1 Caramac bar
METHOD

For the cake:
  1. Pre-heat the oven to 180 degrees C and line two round baking tins with parchment paper.
  2. Whisk the butter/margarine and sugars together in a large mixing bowl until pale then whisk in the eggs,
  3. Fold in the flour, mashed bananas, vanilla extract, caramel flavouring and baking powder until a batter of a soft dropping consistency has formed.
  4. Pour the mixture into the prepared cake tins then pop in the oven and bake for around 20-25 minutes until a cocktail stick inserted into the sponges comes out clean.
  5. When baked, leave the cakes to cool on a wire rack before turning them out of the tins. At this stage the sponges can be frozen for decorating at a later date if you wish.
For the buttercream/topping:
  1. Place the butter, caramel flavouring and brown sugar in a bowl then whisk while gradually adding the icing sugar until a smooth mixture has formed.
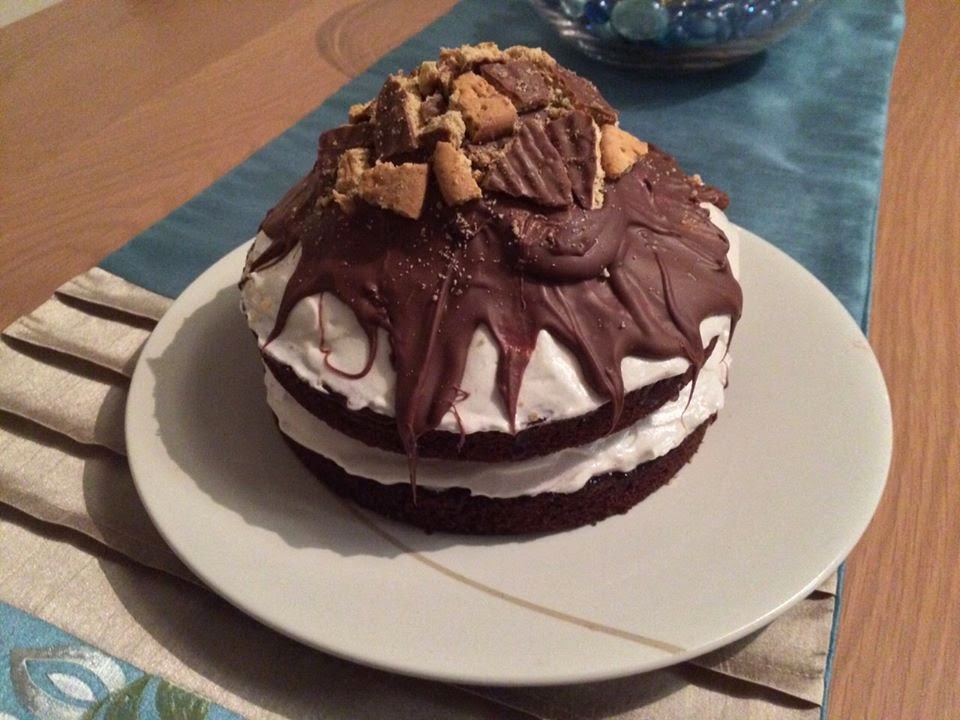
  2. Spread half of the buttercream on one of the sponges then sandwich the other on top, then spread the rest of buttercream on the top layer.
  3. Chop the Caramac and Chomp bars into small squares using a sharp knife or scissors then place them on top of the cake before finishing off with a few sprinkles of brown sugar.


I also used this recipe to make cupcakes to take to my old workfriends :) The above quantities will yield about 12-15 cupcakes.

Tuesday, 19 May 2015

World Baking Day!

Just a quick post to say that my submission to World Baking Day's 'Victory Bakes' on Twitter received a rosette :) My contribution was the birthday cake I made for my best friend's birthday last July - Victoria sponge filled with jam and fresh cream and decorated with white chocolate finger biscuits, strawberries and purple glitter, adorned with shortbread hearts as a finishing touch. I chose this cake because a) although it was actually very easy to make, I think it looks the most impressive and professional of all my bakes, and b) World Baking Day is about baking for someone you love and my bestie Danielle is one of the people I love most in this world!


On the actual day (Sunday 17th May) I made some rhubarb & custard and peanut butter & chocolate thumbprint cookies for my parents and their friends who came over for dinner - recipe will be up on the blog soon :) 

Did you participate in World Baking Day? If so, what did you make and who was the lucky recipient?

Sunday, 10 May 2015

Lemon Crunch Cupcakes

Isn't it funny how sometimes the most hurried and improvised of culinary creations turn out the most delicious? Like these yummy little cakes - they came about almost by accident but I'm glad they did as I'll definitely be making them again, especially now spring is here! I fancied making some cupcakes that were quick and straightforward but a bit different from ones I'd made recently, and I remembered I had a couple of lemons in the freezer (yes, you can freeze lemons! The insides go quite mushy but they still keep their flavour and juicyness), so I thought I'd have a go at lemon drizzle cakes. I then found that a) my grater was too blunt to grate the lemon zest for the sponge and b) I didn't have any icing sugar. I improvised by adding the juice to the batter instead, convinced that its acidity would stop the cakes from rising or just generally make them taste funny, but they came out beautifully with a subtle zing :) Unable to make icing, I simply created a slapdash mixture of granulated sugar and the rest of the lemon juice and plonked it on the tops of the cupcakes around 5 minutes before they were due to come out of the oven. The result was a lovely sweet but citrussy crunchy topping which is very reminiscent of the traditional pancake topping! You can use as much or as little topping as you like depending on how sweet you want the cakes but you don't need a great deal to get the texture and flavour.


I love how the topping looks like a crisp winter frost!


INGREDIENTS - makes approx. 10-12 cupcakes

For the cakes:
  • 125g self-raising flour
  • 115g caster/granulated sugar
  • 115g butter/margarine
  • 2 eggs
  • Juice of half a lemon
  • Pinch of baking powder
For the topping:
  • 1 tbsp granulated sugar
  • Juice of half a lemon
METHOD
  1. Pre-heat the oven to 180 degrees and line a cupcake/muffin baking tray with 12 paper cases.
  2. Whisk the butter/margarine together in a large mixing bowl until pale then whisk in the eggs.
  3. Fold in the flour, lemon juice and baking powder until a batter of a soft dropping consistency has formed.
  4. Drop the mixture into the cake cases using a teaspoon until they're each about two thirds full.
  5. Pop in the oven and then prepare the topping by mixing the sugar and remaining lemon juice together roughly in a bowl.
  6. After around 8-10 minutes, remove the cakes from the oven and spread the sugar and lemon juice mixture over the tops - this is quite fiddly as it's so sticky but I found the easiest way to do it was using my fingers.
  7. Place the cakes back in the oven and bake for a further 5 minutes until a cocktail stick inserted into the sponge comes out clean.
  8. When baked, place on a wire rack and leave to cool before enjoying.

Tuesday, 14 April 2015

Chocolate Teacake Cake

Before Easter I was struck down with gastroentiritis and it was an utterly horrendous experience. Crippling stomach pains and the inability to eat anything but dry crackers and ginger nut biscuits for over a week meant I was fantasising about the day I could finally stuff my face with indulgent food again, and I swore I'd treat myself by making a big decadent cake when I was better. Luckily, I recovered in time for the Easter weekend and decided to set myself the challenge of baking something chocolatey that didn't involve Mini Eggs or Creme Eggs. Don't get me wrong, I LOVE Mini Eggs and Creme Eggs but I thought it'd be fun to try something outside-the-box. The result was a creation inspired by one of my favourite treats, chocolate teacakes, with their heavenly combination of fluffy marshmallow filling, strawberry jam, biscuit base and a crisp chocolate coating. The flavours and textures transfer really well into cake form and it was a lot of fun to make, especially the mountain of meringue frosting topped with a chocolate shell!

Freezing the marshmallow frosting for five minutes before pouring on the melted chocolate is a great tip I picked up from a recipe for hi-hat cupcakes and it really works! Make sure you don't omit this step or you'll end up with a runny, melty mess. Also, as I mentioned in my Neapolitan Cake post, although beating egg white with icing sugar makes for a deliciously marshmallow-like frosting, it doesn't last well and will begin to shrink after a couple of days. The cake will still be delicious but it won't look as good!


INGREDIENTS

For the cake:
  • 225g self-raising flour
  • 225g caster/granulated sugar
  • 225g butter/margarine
  • 4 eggs
  • 2 heaped tbsp cocoa powder
  • 2 tsp vanilla extract
For the frosting/filling/topping:
  • 2 egg whites
  • 4 tbsp icing sugar
  • 2 tsp vanilla extract
  • 2 tsp golden syrup
  • 0.5 tsp cream of tartar (optional but helps to stabilise the mixture)
  • 5 tbsp (approx.) strawberry jam
  • 100g milk chocolate
  • 3-4 milk chocolate or plain digestive biscuits

METHOD

For the cake:
  1. Pre-heat the oven to 180 degrees C and and line two round baking tins with parchment paper.
  2. Whisk the butter/margarine and sugar together in a large mixing bowl until pale then whisk in the eggs.
  3. Fold in the flour, cocoa powder and vanilla extract until a batter of a soft dropping consistency has formed.
  4. Pour the mixture into the prepared cake tins then pop in the oven and bake for around 15-20 minutes until a cocktail stick inserted into the sponges comes out clean.
  5. When baked, leave the cakes to cool on a wire rack before turning them out of the tins. At this stage the sponges can be frozen for decorating at a later date if you wish.
For the frosting/filling/topping:
  1. Spread the strawberry jam generously across the top of one of the cooled sponges.
  2. Separate the egg whites into a clean bowl and whisk with the vanilla extract, golden syrup and cream of tartar, while adding the icing sugar a few teaspoons at a time, until stiff peaks form - you should ideally do this for a minimum of 7-10 minutes.
  3. Spread about a third of the frosting on top of the jam-covered sponge using a palette knife then sandwich the other sponge on top. 
  4. Spread the rest of the frosting on top of the cake to form a mountain - pile it up as high as possible - then place in the freezer for about 5 minutes until it's fairly firm.
  5. While the cake is in the freezer, place the chocolate in a heatproof bowl and melt over a pan of hot water or in the microwave in blasts of 30 seconds until smooth.
  6. Remove the cake from the freezer and immediately pour the melted chocolate over the top of the frosting mountain so that it drizzles down the sides. 
  7. Crush the digestive biscuits into chunks by hand and place on top of the chocolate covering then leave to set before serving.

Saturday, 21 March 2015

Custard Cream Cake

This recipe is basically a large version of the cupcakes I created but never got round to blogging about after being inspired by the custard cream biscuits I made here: http://cloudninepointone.blogspot.co.uk/2013/10/custard-creams-strawberry-milkshake.html.

I made this quick and simple cake on a whim while round my other half's after discovering he had custard powder in the cupboard and it was absolutely scrumptious with its light sponge, smooth icing and lovely vanilla flavour. If you want to make it a bit more of a 'show stopper' bake by all means double the quantities and make as a double layer cake sandwiched with extra custard buttercream and top with some custard cream biscuits or other decorations to finish, but if you're just after something delicious with minimal faff then look no further than the recipe below :)


I love the sunshine yellow colour!

INGREDIENTS

For the cake:
  • 160g self-raising flour
  • 170g caster/granulated sugar
  • 170g butter/margarine
  • 3 eggs
  • 2 heaped tbsp custard powder
  • 2 tsp vanilla extract
For the custard buttercream icing:
  • 100g icing sugar
  • 50g butter (unsalted if preferred)
  • 1 tbsp custard powder
  • 1 tsp vanilla extract
METHOD

For the cake:
  1. Pre-heat the oven to 180 degrees C and line a round cake tin with baking parchment.
  2. Whisk the butter/margarine and sugar together in a large mixing bowl until pale then whisk in the eggs.
  3. Fold in the flour, custard powder and vanilla extract until a batter of a soft dropping consistency has formed.
  4. Pour the mixture into the prepared cake tin and bake in the oven for around 20-25 minutes until a cocktail stick inserted into the sponge comes out clean.
  5. When baked, leave to cool on a wire rack before turning the sponge out of the tin. At this stage the cake can be frozen for decorating at a later date if you wish.
For the icing:
  1. Place the butter and vanilla extract into a bowl and whisk while gradually adding the icing sugar and custard powder until a thick, fluffy mixture has formed.
  2. Spread the icing onto the top of the cooled cake using a palette knife, then dive in!
This recipe can also be used to make cupcakes (yields around 10-12) instead of one large cake:

Tuesday, 10 March 2015

Neapolitan Cake

I've been sticking to lower fat/sugar bakes for the last couple of months as part of my new year (mostly) healthy eating regime but last weekend while back home at my parents' I was desperate to just go nuts and make a proper double decker sponge with lashings of scrummy frosting. I've wanted to try a tri-colour Neapolitan ice cream inspired cake, with layers of chocolate, vanilla and strawberry, for a while so this was the perfect time to give it a go. I'm really pleased with how it turned out and think it looks really pretty and cheery!

The frosting I used in this recipe is just egg white beaten with icing sugar plus flavouring and food colouring and this makes for a lovely light, almost marshmallow-like texture which is less sickly than buttercream. However, a word of warning: it starts to shrink and evaporate after 24 hours or so so if you're making the cake in advance I'd recommend using buttercream icing instead as it will last much longer.

Side note: A lot of my previous cake recipes on here have listed the quantities in ounces but I've decided to start using metric only from now on in order to be consistent.


INGREDIENTS

For the cake:
  • 225g self-rasing flour
  • 225g caster/granulated sugar
  • 225g butter/margarine
  • 4 eggs
  • 2 heaped tbsp cocoa powder
  • 2 tsp vanilla extract
  • 50g chocolate chips (optional but very yummy)
For the icing/jam filling:
  • 1 egg white
  • 2 tbsp icing sugar
  • 1 tsp strawberry extract
  • Few drops of red food colouring
  • Handful coloured vermicelli
  • 4 tbsp (approx.) strawberry jam
METHOD

For the cake:
  1. Pre-heat the oven to 180 degrees C and line two round baking tins with parchment paper.
  2. Whisk the butter/margarine and sugar together in a large mixing bowl until pale then whisk in the eggs.
  3. Fold in the flour and vanilla extract until a batter of a soft dropping consistency has formed.
  4. Separate half of the mixture into a second bowl and and fold in the cocoa powder and chocolate chips.
  5. Pour the mixtures one each into the two cake tins.
  6. Pop in the oven and bake for about 15-20 minutes until a cocktail stick inserted into the sponge comes out clean.
  7. When baked, place on a wire rack and leave to cool before turning the cakes out of the tins. At this stage the cakes can be frozen for decorating at a later date if you wish.
For the icing/filling:
  1. Spread the strawberry jam onto the top of the cooled chocolate sponge and sandwich the vanilla sponge on top.
  2. Separate the egg white into a clean bowl and whisk with the strawberry extract until stiff peaks form while adding the icing sugar a few teaspoons at a time.
  3. Add the food colouring a couple of drops at a time and whisk again until you have your desired shade of pink.
  4. Spread the icing over the top of the cake using a palette knife - tap roughly with the palette knife to achieve the fluffy effect in the photo - and then sprinkle with vermicelli as a colourful finishing touch.

Saturday, 20 December 2014

Chocolate Gingerbread Cake

WARNING: this stuff is highly addictive!! Seriously, I made a batch with the aim of taking half into university to share with my classmates but it somehow all disappeared in a number of freak scoffing accidents before I had the chance...

The recipe below is adapted from one found in an old winter issue of Good Food magazine - I thought the original batter lacked a chocolatey flavour and didn't really taste much different from normal gingerbread cake so I added cocoa to the mix which resulted in the perfect marriage of chocolate and spice. I also cut down the amount of treacle and syrup used as I felt the previous quantities were a bit excessive.

This cake is definitely my new festive favourite as it's so deliciously moist, smells incredible and is super simple to make. It also keeps really well and, if anything, tastes better after a couple of days (if you can make it last that long...)


I finished this batch off with some sprinkly chocolate rings from Aldi.

INGREDIENTS - makes approx. 12 large squares

  • 9 oz self-raising flour
  • 5.5 oz butter/margarine
  • 4 oz dark brown sugar
  • 4 oz black treacle
  • 4 oz golden syrup
  • 4 oz milk or dark chocolate
  • 2 tbsp cocoa powder
  • 1 tsp ground ginger
  • 2 tsp ground cinnamon
  • 1 tsp mixed spice
  • 5 fl oz milk
METHOD
  1. Pre-heat the oven to 180 degrees C and line a rectangular cake tin with baking parchment.
  2. Place the butter/margarine, sugar, treacle, syrup and spices into a heatproof bowl and melt in the microwave until smooth or melt in a pan over the hob.
  3. Roughly chop the chocolate into small pieces and place in another heatproof bowl then melt in the microwave in blasts of 30 seconds-1 minute or over a pan of hot water. 
  4. Stir the melted chocolate into the butter mixture then fold in the flour, cocoa powder and milk.
  5. Pour the mixture into the cake tin then bake for 20-30 minutes until a skewer inserted into the cake comes out clean.
  6. Transfer (with the baking parchment) onto a wire rack to cool then cut into squares with a sharp knife. Top with festive decorations of your choice if you wish.

Tuesday, 14 October 2014

Green Tea Cupcakes with White Chocolate Icing

I'm back! After a bit of an absence from my wee blog due to moving and dieting, I'm now settling into life in London as a postgraduate English Linguistics student, and I've joined my university's Baking Society which has made the cake making urges return tenfold! I attended their welcome meeting last week and had a jolly old time meeting fellow baking enthusiasts and sampling some scrumptious homemade goodies. The theme for the night was 'try something new' so I thought this'd be the perfect excuse to try out the matcha green tea powder my other half very kindly brought me back from California after I said I'd like to use some in my cooking. Fortunately the oven in my new flat is wonderful and these cakes turned out beautifully - despite turning the sponge a lurid swampy colour, the green tea powder gives them a lovely subtly fragrant twang which works well with white or milk chocolate icing. I'm proud to say they were the first tin of cakes to disappear!

I've since found out that matcha green tea powder is extremely expensive to buy here in the UK (I've seen prices from £20 to £50!!) so they may not be the most practical cupcakes to try. However, you could add the contents of regular green tea bags instead and still get the flavour, just without the distinctive eye-catching green sponge.


Like a moron I forgot to photograph the insides of the cakes but the sponge came out very green! I ran out of white chocolate icing for the last two cakes and was in a hurry so I slathered them in Nutella - they were also delicious!

INGREDIENTS - makes approx. 12-14

For the cakes:
  • 6 oz self-raising flour
  • 6 oz caster/granulated sugar
  • 6 oz butter/margarine
  • 3 eggs
  • 1 tbsp matcha green tea powder
  • 1 tsp vanilla extract
For the icing (measurements very approximate, sorry!):
  • 5 oz white chocolate
  • 3 tbsp butter (unsalted if preferred)
  • 3 tbsp icing sugar
  • Splash of milk
  • A few pinches of matcha green tea powder
  • 12 wafer daisies (optional)
METHOD

For the cakes:
  1. Pre-heat the oven to 180 degrees C and line a baking tray with 12 paper cases.
  2. Whisk the butter/margarine and sugar together in a large mixing bowl until pale then whisk in the eggs.
  3. Fold in the flour, green tea powder and vanilla extract until a batter of a soft dropping consistency has formed.
  4. Drop the mixture into the cake cases using a teaspoon until they're each about two thirds full.
  5. Pop in the oven and bake for about 12-15 minutes until a cocktail stick inserted into the sponge comes out clean.
  6. When baked, place on a wire rack and leave to cool. At this stage the cakes can be frozen for decorating at a later date if you wish.
For the icing:
  1. Chop the chocolate into small pieces and melt in a heatproof bowl over a saucepan of hot water or place in the microwave and heat in blasts of about 30-40 seconds (or 1 minute if using cooking chocolate - this tends to be more forgiving) until smooth.
  2. Add the butter, icing sugar and milk and beat until the mixture is a spreadable consistency. If it's too runny add more icing sugar and if it's too stiff add more milk.
  3. Spread onto the cakes using a palette knife - make sure you work quickly as this icing tends to stiffen rapidly!
  4. Sprinkle a little matcha green tea powder onto the top of each cake and add a wafer daisy as a pretty finishing touch if you wish. Voila!

Saturday, 7 June 2014

Cherry Bakewell Cupcakes

I've always thought there's something so cute and jolly about (albeit not strictly traditional) Mr Kipling style individual bakewell tarts, with their pure white fondant icing and bright red cherry decorations sitting atop jam-filled sponge and pastry. I'm not even a fan of almonds but I love them! They were the inspiration for these lovely and easy to make cupcakes, which I think scream retro village fete cake stall. I'm always reluctant to use glace icing due to being paranoid its runniness will make my creations look like a three-year-old was let loose in the kitchen but luckily keeping it at quite a thick consistency meant they looked a tad more sophisticated.

I just used ground almonds in the sponge as I didn't have any almond essence to hand and still managed to achieve a subtle nutty taste, but you may like to add some almond essence to the sponge and/or icing if you have some to further enhance the bakewell flavour.


INGREDIENTS - makes approx. 12-14 cakes

For the cakes:
  • 6 oz self-raising flour
  • 3.5 oz ground almonds
  • 8 oz caster/granulated sugar
  • 8 oz butter/margarine
  • 4 eggs
  • 1 tsp vanilla extract
For the glace icing/jam filling:
  • 4 oz icing sugar
  • Water or milk
  • 12-14 tsp (approx.) strawberry or raspberry jam (raspberry is traditional but I used strawberry as my friend at work is allergic to raspberries)
METHOD


For the cakes::
  1. Line a baking tray with 12 paper cases.
  2. Whisk the margarine/butter and sugar together in a large mixing bowl until pale then whisk in the eggs.
  3. Fold in the flour, ground almonds and vanilla extract until a batter of a soft dropping consistency has formed.
  4. Drop the mixture into the cake cases using a teaspoon until they're each about two thirds full.
  5. Pop in the oven and bake at 180 degrees C for about 12-15 minutes until a cocktail stick inserted into the sponge comes out clean.
  6. When baked, place on a wire rack and leave to cool. At this stage the cakes can be frozen for decorating at a later date if you wish.
For the filling/icing:
  1. If your cupcakes have risen up to form dome tops in the oven and you'd prefer a flat surface to put the icing on to avoid excessive drizzling, use a serrated knife to slice the tops of the cakes off (don't throw them away - scoff them later!)
  2. Using a teaspoon or small sharp knife, carefully cut a small hole (about 2cm deep by 2cm wide) in the top of each cupcake. Don't discard the bits you've cut out!
  3. Drop about a teaspoon of jam into each hole and then gently push the sponge part that was cut out back into each one so that the tops of the cakes are even.
  4. Place the icing sugar into a bowl then add enough milk or water and stir to form a thick but slightly running mixture.
  5. Spread the icing onto the top of each cupcake in a thick, even layer using a teaspoon or pallette knife and top with a glace cherry.

Monday, 26 May 2014

Coconut Ice Cakes

I should probably begin this post by declaring the following: I do not like coconut cake. I really don't. However, for some bizarre reason, I'm a huge fan of the colourful sugary treat known as coconut ice. I'm not normally a big lover of sweets in general but I've been craving this by the bucketful the last few weeks and so, out of curiosity, had a Google to see whether anyone had had the stroke of genius to incorporate it into a cake recipe. Shockingly enough, turns out no one had. Naturally, I had to try and resolve this so I donned my experimental chef's hat and hit the kitchen armed with desiccated coconut, red food colouring and crossed fingers. I'm pleased to say the result was fantastic - simply adding desiccated coconut to regular buttercream icing really does make it taste very reminiscent of the sweet itself - and it went down a storm with my colleagues :)

For an extra homemade touch, you could make the actual coconut ice yourself (it's very easy - mostly just desiccated coconut and condensed milk) but, if I'm brutally honest, *whispers* I prefer the bought stuff. On that bombshell, here's my recipe...

Aren't they pretty??

INGREDIENTS - makes approx. 12 large squares

For the cakes:
  • 12 oz self-raising flour
  • 12 oz butter/margarine
  • 12 oz granulated/caster sugar
  • 6 eggs
  • 1 tsp vanilla extract
  • 2 oz strawberry milkshake powder
  • 1 tsp strawberry extract
  • Few drops of red gel food colouring
For the coconut icing/jam filling:
  • 4 oz icing sugar
  • 2 oz butter (unsalted if preferred)
  • 2 tbsp desiccated coconut
  • 1 tsp vanilla extract
  • Few drops of red gel food colouring
  • 4-5 tbsp strawberry jam
  • 12 small cubes of coconut ice (or 6 large chunks cut in half)
METHOD

For the cakes:
  1. Grease two identical cake tins with butter/margarine or line with baking parchment.
  2. Whisk the margarine/butter and sugar together in a large mixing bowl until pale then whisk in the eggs.
  3. Fold in the flour until a batter of soft dropping consistency has formed then place half of the mixture into a separate bowl.
  4. Add the vanilla extract to one bowl and set aside.
  5. Add the strawberry milkshake powder and strawberry extract to the other bowl then stir in the red food colouring a drop at a time until the mixture turns a pale pink colour.
  6. Pour each bowl of cake batter into the two separate tins and bake at 180 degrees C for about 15-18 minutes until a cocktail stick inserted into the sponges comes out clean.
  7. When baked, place the cakes on a wire rack and leave to cool. At this stage they can be frozen for decorating at a later stage if you wish.
For the coconut icing/jam filling:

  1. Spread the strawberry jam onto the top of the pink sponge and carefully place the yellow sponge on top (you may wish to trim the tops to make them nice and flat so they sandwich together more easily).
  2. Place the butter and vanilla extract into a bowl and stir/whisk while gradually adding the icing sugar until a thick, fluffy mixture has formed.
  3. Stir in the desiccated coconut and red food colouring until the icing turns your desired shade of pink.
  4. Spread the icing over the top of the cake in an even layer then neatly trim off the outer edges of the cake to get the full effect of the lovely coloured sponge layers (but don't throw away the offcuts, they're still yummy!) 
  5. Cut into 12 even squares then top each one with a piece of coconut ice.

Tuesday, 6 May 2014

Maria's Ridiculously Good Best Ever Blondies

I normally find it quite arrogant when people put their names on recipes but I couldn't resist putting my stamp on this one as it's my definite favourite of all the baked creations I've made up myself so far, and their irresistible butterscotchy flavour really makes them ridiculously good!

I was reluctant to reveal my secret ingredient to my eager samplers but I shall share it here for the benefit of the baking community at large (ahem). And that secret ingredient is...*drum roll*...custard powder. This idea came about when I was simply too lazy to look up a blondie recipe and decided just to go by my fail safe brownie recipe (available here: http://cloudninepointone.blogspot.co.uk/2013/09/best-ever-jack-daniels-brownies ) and substitute the milk chocolate for the white variety. It then dawned on me that I had no idea what to add in place of the cocoa powder. There's no such thing as white cocoa powder (to my knowledge?!) and I was worried that making up the cocoa quantity with more flour would affect the flavour and make them too plain so, in the absence of butterscotch Angel Delight, I reached for the vanilla scented custard powder. And hey presto! The rest is scrumptious cakey history.


The lovely golden blondies pictured with their darker chocolate bretherin, pre-cutting...

INGREDIENTS
  • 200g granulated/caster sugar
  • 2 eggs
  • 80g self-raising flour
  • 120ml cooking oil
  • 130g white cooking chocolate
  • 4.5 tbsp custard powder
  • 1 tbsp vanilla extract
  • Few drops of Lakeland buttery caramel flavouring (optional but really makes the butterscotchy flavour pop!)
METHOD
  • Grease the baking tin with margarine/butter or line with baking parchment.
  • Briefly whisk the sugar, eggs, oil, vanilla extract and caramel flavouring together in a large mixing bowl.
  • Chop the chocolate into small chunks and melt in a heatproof bowl over a saucepan of hot water or place in the microwave and heat in blasts of about 1 minute until smooth, then pour into the mixing bowl.
  • Fold the flour and custard powder into the mixture and pour into the lined tin.
  • Pop in the oven and bake at 180 degrees C for about 20 minutes until a cocktail stick inserted into the cake comes out pretty much clean then leave to cool.
  • Cut the blondies into squares using a sharp knife and marvel at their deliciousness as you dive in.

Friday, 28 February 2014

Belgian Speculoo (Caramelised Biscuit) Cupcakes

I thought it was about time I made my first blog post of 2014!

In October last year I went for a lovely long weekend in Bruges with one of my best friends and, in between stuffing our faces with the heavenly chocolate and fruit beer, we found ourselves sampling delicious golden caramel-flavoured 'Speculoo' spread every morning with breakfast in the hotel. This is a peanut butter style spread that's made from 'Speculoo' biscuits which, we later found out from the distinctive red and white packaging, can be bought here in the UK under the name 'Lotus Caramelized Biscuits'. Just recently, the spread has also become available to buy in the supermarkets over here so it went without saying that I needed to cake-ify it somehow! And here's the meltingly moreish result, topped off with Belgian chocolate chips for the ultimate Bruges experience :)

(Sorry for the rather pants photo, took it on my phone...)

INGREDIENTS - makes approx. 12 medium-large cakes

For the cakes:
  • 6 oz self-raising flour
  • 4 oz brown sugar
  • 2 oz caster sugar
  • 6 oz butter/margarine
  • 3 eggs
  • 1 tsp vanilla extract
  • 0.5 tsp baking powder
  • 1 tsp Lakeland buttery caramel flavouring (optional but stunningly delicious and aromatic!)
For the icing (apologies if measurements are a bit off here, made it up as I went along):
  • 3 tbsp butter (unsalted if preferred)
  • 4 tsbp Lotus Caramelized Biscuit spread
  • 4 tbsp icing sugar
  • 1 tsp vanilla extract
  • 3 tsp milk
  • Few drops of Lakeland buttery caramel flavouring (again, optional but scrummy!)
  • Handful of Belgian chocolate chips
METHOD

For the cakes:
  1. Line a baking tray with 12 paper cases.
  2. Whisk the margarine/butter and both lots of sugar together in a mixing bowl then whisk in the eggs.
  3. Fold in the flour, baking powder, vanilla extract and caramel flavouring until a batter of a soft dropping consistency has formed.
  4. Drop the mixture into the paper cases using a teaspoon until they're each about two thirds full.
  5. Pop in the oven and bake at 180 degrees C for about 12-15 minutes until a cocktail stick inserted into the sponge comes out clean.
  6. When baked, place on a wire rack and leave to cool. At this stage the cakes can be frozen for decorating at a later stage if you wish.
For the icing:
  1. Stir/whisk the butter, Lotus spread, vanilla extract, caramel flavouring and icing sugar together in a bowl until well combined, while gradually adding the milk to loosen the mixture until it's of a spreadable consistency. If it's too thick, add more milk and if it's too runny, add more icing sugar.
  2. Spread onto the cakes using a palette knife or pipe on using the nozzle of your choice.
  3. Top each cake with a few Belgian chocolate chips.

Sunday, 30 June 2013

Golden Caramac Cupcakes

Seriously, who doesn't love Caramac?? I'm so glad you can still buy these deliciously retro and unique golden caramel flavoured chocolate bars in most shops. This recipe is so easy but great if you want something a bit different from normal chocolate cupcakes, and the mere smell will have people salivating in anticipation! Adding half dark brown sugar to the batter is a simple twist on a regular cupcake but the result is a divinely butterscotchy flavour which really compliments the Caramac frosting. The creation of these babies coincided with Bargain Baking Find of the Year, courtesy of my mum - she picked up a can of Dr Oetker's amazing Golden Shimmer Spray for 49p instead of a whopping £3.99 just because the main cap was missing! I don't think I could justify paying full whack for it but the metallic sheen it creates is just fantastic and perfect for this recipe, although the cakes are just as delicious without it.


INGREDIENTS - makes approx. 12

For the cakes:
  • 4 oz self-raising flour
  • 2 oz caster sugar
  • 2 oz dark brown sugar (sifted if preferred)
  • 4 oz margarine/butter
  • 2 eggs
  • 1 tsp vanilla extract
  • 1/4 tsp baking powder
For the icing:
  • 4 oz butter (unsalted if preferred)
  • 8 oz icing sugar
  • 3 30g Caramac bars
  • Dr Oetker Gold Shimmer Spray (optional)
METHOD

For the cakes:
  1. Line a baking tray with 12 paper cases.
  2. Whisk the margarine/butter and both lots of sugar* together in a mixing bowl then whisk in the eggs.
  3. Fold in the flour, baking powder and vanilla extract until a batter of a soft dropping consistency has formed.
  4. Drop the mixture into the paper cases using a teaspoon until they're each about two thirds full.
  5. Pop in the oven and bake at 180 degrees C for about 12-15 minutes until a cocktail stick inserted into the sponge comes out clean.
  6. When baked, place on a wire rack and leave to cool. At this stage the cakes can be frozen for decorating at a later stage if you wish.
For the icing:
  1. Break one of the Caramac bars up into a heatproof bowl and place over a saucepan of simmering water without letting the bottom of the bowl touch the water, or heat on short bursts of LOW heat in the microwave, until completely melted.
  2. Add the butter and stir/whisk while gradually adding the icing sugar until a thick, fluffy mixture has formed. If it's too runny, add some more icing sugar.
  3. Spread onto the cakes using a palette knife or pipe on using the nozzle of your choice, then spray with the gold Shimmer Spray (I found this works best when keeping the can about 10 ins away from the cake).
  4. Carefully break or cut the remaining two Caramac bars into 12 rectangular sections and push one onto the top of each cake as a neat finishing touch.
* You may find that the dark brown sugar stays a bit lumpy; I actually prefer it like this as biting into melty specks of it in the baked cupcake is rather heavenly IMO, but if you want a more even mixture sieve the brown sugar before adding it.

Saturday, 8 June 2013

Cheer-Me-Up Angel Cake

Of all the cakes I've made this is certainly not one of the most elegant - I even overcooked the sponges (although I seem to have mastered the art of nice even cupcakes my large round cakes always come out abysmally) - but after a horrible week of suffering from a severe chest infection and generally feeling rubbish, by the weekend I had a serious craving for a massive dose of unapologetically sinful sweet, spongey, jammy, melt-in-the-mouth, no-frills CAKE. CAKE just for me!! And the result was blissfully delicious, though unfortunately so much so that my family managed to devour the majority of it! I used my favourite vanilla buttercream icing and, being a sucker for girly prettiness, I made pink and yellow angel cake sponges topped off with rainbow sprinkles for added cheeriness. As I said, this is by no means the most sophisticated of cakes but it's super easy and certainly won't fail to raise a smile!


INGREDIENTS - makes 2 sponge layers of 8in/10cm diameter

For the cake:
  • 8 oz self-raising flour
  • 8 oz caster sugar
  • 8 oz margarine/butter
  • 4 eggs
  • 1/4 teaspoon baking powder
  • 2 tsp vanilla extract
  • Few drops red food colouring
For the filling/icing:
  • 2 tbsp (approx.) jam of your choice (I used strawberry)
  • 10 oz icing sugar
  • 2 oz cream cheese (at room temperature, full-fat works best)
  • 2 oz butter (unsalted if preferred)
  • 1 tsp vanilla extract
  • Coloured sprinkles, to decorate
METHOD

For the cake:
  1. Grease two round cake pans of around 8in/10cm in diameter or line with baking parchment.
  2. Whisk the margarine/butter and sugar together in a large mixing bowl until pale then whisk in the eggs.
  3. Fold in the flour, baking powder and vanilla extract until a batter of a soft dropping consistency has formed.
  4. Pour half of the mixture into one of the cake pans - it shouldn't be any more than two thirds full.
  5. Add a few drops of red food colouring to the remaining batter until it has turned a pale pink colour. Don't worry too much if it doesn't look the perfect shade, it will look different when baked.
  6. Pour the mixture into the second cake pan - again, it shouldn't be any more than two thirds full (if you have any leftover batter at this stage why not fill a few cupcake cases? :)
  7. Pop in the oven and bake at 180 degrees C for about 15-18 minutes until a cocktail stick inserted into the sponge comes out clean.
  8. When baked, remove the cakes from the pans (I still haven't mastered the art of this!!) and leave to cool on a wire rack. At this stage the sponges can be frozen for assembling and decorating at a later date if you wish.
For the filling & icing:
  1. Whisk the butter, cream cheese and vanilla extract together in a bowl and then gradually add the icing sugar until a pale spreadable mixture has formed. If too stiff, add a little milk and if too runny, add some more icing sugar.
  2. If the sponges have risen up too much in the middle, saw off the tops using a sharp serated knife so that they're nice and flat, otherwise they'll be horribly wobbly when stacked together. See below for an idea of what to do with the offcuts!
  3. Place the yellow sponge on something flat that it will not need to be moved from when completed, e.g. a cake board, tray or tin lid (moving the finished cake is best avoided if possible!), then spread a thin layer of jam all over the top of the yellow sponge followed by a thin layer of the buttercream icing. If any bits of the sponges have fallen off these can be 'glued' back on with jam :)
  4. Firmly place the pink sponge on top then spread the buttercream icing all over the assembled cake with a palette knife, smoothing out the top and sides as you go, while attempting to resist repeatedly sampling its fluffy, vanilla-y deliciousness.
  5. Decorate with rainbow sprinkles for some extra colour.
Leftover sponge and icing...?

Simply layer torn up chunks of pink and yellow sponge and jam in small individual containers (e.g. ramekins or teacups) then top with icing and sprinkles to make some cute little trifle-style angelic desserts!


Saturday, 18 May 2013

Cheat's Creme Brulee Cupcakes

I adore a good creme brulee so I leapt at the chance of transforming this silky, creamy dessert into a cupcake. However, after much Googling and continuously seeing the words 'separate egg yolks' and 'blow torch' I immediately decided they were too much effort. Because I'm lazy like that.

I then stumbled across an American recipe where the cupcakes were filled with vanilla flavour 'pudding' which sounded like minimal faff but, sadly, what the Americans refer to as 'pudding' (a kind of creamy dessert usually served in individual pots if I remember rightly from watching Scrubs) is not widely available here in the UK. Luckily I discovered the perfect substitute in the form of vanilla flavour Alpro soya dessert! This can be bought as a pack of four individual pots from most major supermarkets and can usually be found among the gluten/dairy-free products (they're also available in dark chocolate, milk chocolate and toffee which are all yummy too, just FYI). I decided to take the plunge and attempt some spun sugar decorations (actually not as scary as they sound) for an authentically crisp but refreshingly blowtorch-free creme brulee-esque topping. Rounded off with a simple vanilla buttercream icing, these little beauties went down a treat, with many 'ooh's of admiration :) And they're so ridiculously easy to make!

You'll only need to use a small amount of the soya dessert for the cakes but any that's left over is delicious poured over sponge puddings, brownies, other warm desserts etc as a tasty alternative to custard (or of course you could just eat it straight out the pot if you haven't fallen into a sugar coma brought on by sampling icing like me...)


INGREDIENTS - makes approx. 12

For the cakes:
  • 4 oz self-raising flour
  • 4 oz caster sugar
  • 4 oz margarine/butter
  • 2 eggs
  • 1/2 tsp baking powder
  • 1 tsp vanilla extract
For the filling/icing/spun sugar decorations:
  • 12 tsp (approx.) vanilla flavour Alpro soya dessert
  • 5 oz icing sugar
  • 2 oz butter (unsalted if preferred)
  • 1/2 tsp vanilla extract
  • 2 oz caster sugar
METHOD

For the cakes:
  1. Line a baking tray with 12 paper cake cases.
  2. Whisk the margarine/butter and sugar together in a large mixing bowl until pale then whisk in the eggs.
  3. Fold in the flour, baking powder and vanilla extract until batter of a soft dropping consistency has formed.
  4. Drop the mixture into the paper cases using a teaspoon until they're each about two thirds full.
  5. Pop in the oven and bake at 180 degrees C for about 12-15 minutes until a cocktail stick inserted into the sponge comes out clean.
  6. When baked,  place on a wire rack and leave to cool. At this stage the cakes can be frozen for decorating at a later date if you wish.
For the filling, icing & spun sugar decorations:
  1. When they have cooled, use a teaspoon or small sharp knife to carefully cut out a hole (about 2cm in diameter and 1.5cm in depth) in the top of each cupcake, being careful not to cut too deep into the sponge. Don't discard the sponge bits you've cut out!
  2. Put about a teaspoon of the vanilla soya dessert into each hole and gently push the sponge part that was cut out back into each one.
  3. Add the caster sugar to a small pan over LOW heat until it has turned brown and melted to a thick, sticky consistency - DO NOT STIR! Be patient and don't be tempted to turn up the heat to speed up the process as it will burn horribly, trust me!
  4. When all the granules have disappeared, scoop the melted sugar out of the pan using a spatula and spread onto baking parchment or the opened-out clean inside of a cereal packet (sounds odd but works really well for this kind of thing, and it's always good to recycle!) Do this quickly as the sugar will begin to set rapidly.
  5. While you're waiting for the spun sugar to cool and set, place the butter and vanilla extract into a bowl and stir/whisk while gradually adding the icing sugar until a thick, fluffy mixture has formed.
  6. Spoon the icing into a piping bag with a nozzle of your choice attached (I used a large circle one) and squeeze onto the top of each cake, or simply spread the icing on using a palette knife.
  7. Break up your sheet of spun sugar into randomly sized shards and place some on top of each cake just before serving. Any leftover shards can be stored in an airtight container for about a week or so.