Showing posts with label cookies. Show all posts

Tuesday, 3 March 2015

Fabulous Biscotti

I first made these lovely crisp biccies, which go perfectly with a cuppa, with raisins and dark chocolate chips using a brilliant recipe from the Hairy Dieters as inspiration when on the hunt for lower fat/calorie bakes that still delivered a sweet hit. They turned out fantastically and have since become a bit of a signature bake of mine. I love how easy and versatile this recipe is - once you've got the basic biscotti dough you can add pretty much anything you want for flavour; chocolate, spices, citrus zest, dried fruit, nuts...the list is endless!

The original version made with orange zest, dark chocolate chips and dried cranberries weighed in at only 53 calories a piece so, although I can't give an exact estimate when other ingredients are added, the chances are they're still reasonably sin-free provided you don't go too mad with the sugary extras!

I know traditionally biscotti is made with almonds but I always use almond extract as I love the delicate flavour it gives. By all means use whole almonds if you prefer though.


I made these cherry and white chocolate ones for Valentine's Day :)

INGREDIENTS - makes approx. 20 pieces
  • 180g self-raising flour
  • 80g caster sugar
  • 1 egg + 1 egg white*
  • 40g white chocolate chips (or other chocolate/ingredient of choice)
  • 40g glace cherries, chopped into chocolate chip sized pieces (or other dried fruit/ingredient of choice)
  • 1 tsp almond extract
  • 1 tsp vanilla extract
  • 0.5 tsp baking powder
METHOD
  1. Pre-heat the oven to 180 degrees C and line a large flat baking tray with parchment paper.
  2. Mix the dry ingredients together in a large bowl then add the chocolate chips, cherry pieces and almond extract.
  3. Beat the egg and egg white together along with the vanilla extract for around 1 minute and pour into the mixture.
  4. Mix with a wooden spoon and then your hands until the ingredients come together to form a stiff dough. If it's too sticky add a little more flour and if it's too dry and crumbly add a splash of milk.
  5. Roll the dough into a sausage shape about 25-30cm long and place on the baking tray then gently flatten it until it's about 2cm tall.
  6. Place in the oven for around 25-30 minutes until the dough is firm with a crust but still fairly pale.
  7. Remove from the oven and reduce the heat to 140 degrees C then allow the dough to cool for around 10 minutes before sawing into pieces about 2cm thick using a serrated knife.
  8. Place the biscuits back on the baking tray and cook for a further 25 minutes or until lightly browned then leave to cool before enjoying with tea or coffee.
*Please don't throw the spare yolk away if at all possible! It can be used in homemade burgers, Welsh rarebit or eggy bread, among other things (sorry, I just really hate waste!)

Edit: I made these decadent double chocolate biscotti for my friend's birthday by following the above recipe but omitting the almond extract, replacing two heaped tablespoons of flour with cocoa powder and substituting dark chocolate chips in place of the cherries:

Sunday, 22 February 2015

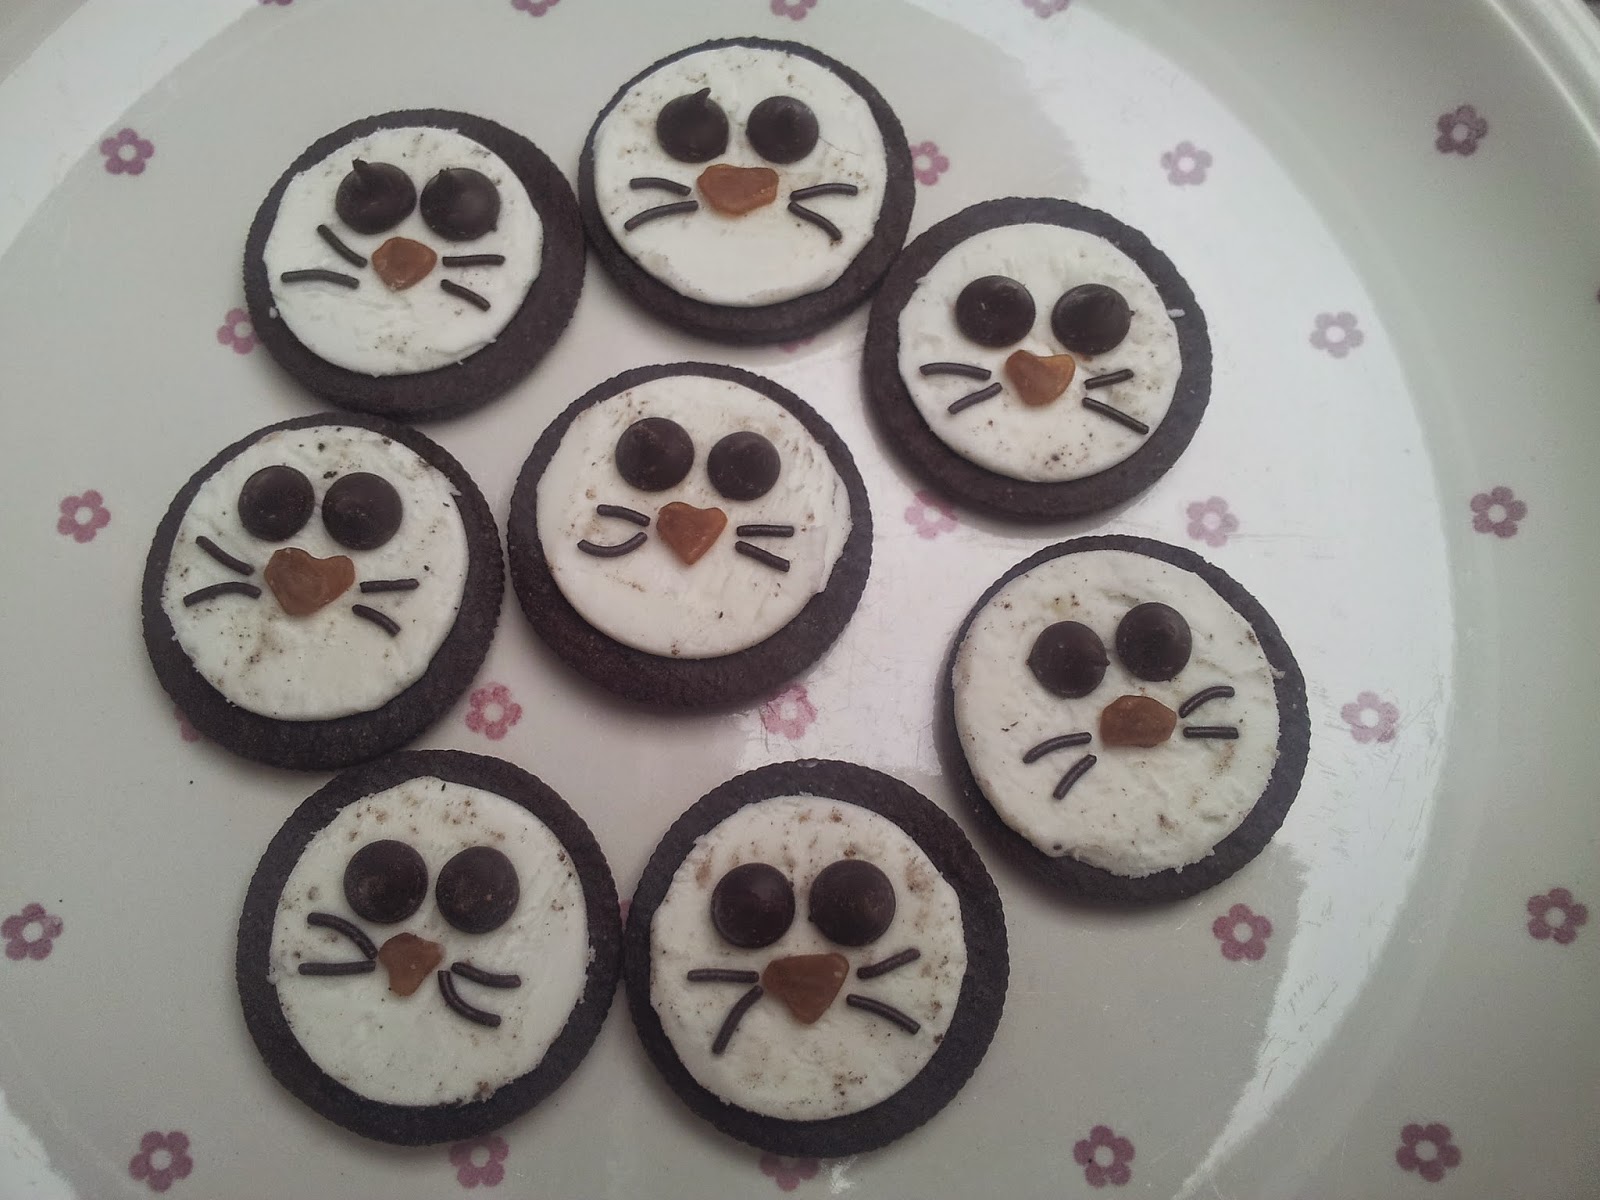
Sealy Oreos

No actual baking required but just wanted to make a quick post about these cute cookies I made as a surprise for my Oreo-loving other half as part of Valentine's Day dinner. They were inspired by The More Than Occasional Baker's adorable penguin Oreos which can be found here: http://themorethanoccasionalbaker.blogspot.co.uk/2015/02/penguin-oreos-for-valentine.html?m=1

Anyone that knows me knows I have a bit of a seal obsession, hence the adaptation - I just think they're so so cute! Separating the cookies without breaking them and keeping the cream intact is easier said than done and putting the little whiskers on is a bit fiddly but they're fun to make and sure to raise a smile :)


INGREDIENTS
- makes 8
  • 8 Oreo cookies
  • 16 dark chocolate chips
  • 8 butterscotch chips
  • Handful chocolate vermicelli
METHOD
  1. Use a sharp knife to carefully remove one side of each Oreo and put the non-cream halves to one side. 
  2. Use the knife to gently scrape any excess crumbs off the cream.
  3. Place pairs of chocolate chips at the top of each cookie as eyes then add the butterscotch chip noses and use tweezers to arrange four vermicelli whiskers on each.

Monday, 9 December 2013

Hot Chocolate Biscuits

My original attempt at hot chocolate biscuits were a sub-par batch of dry, cakey chocolate cookies from a recipe I found online so I went back to the drawing board and invented my own version which keeps the hot chocolate powder, generous chocolate chunks and gooey marshmallow but uses icing sugar in place of caster sugar and plain flour instead of self-raising. This creates a more even and less puffed-up biscuit without making them hard and brittle.

The combination of chunky milk chocolate pieces and chewy marshmallow inside a rich, dark cocoa biscuit makes for a delicious taste and texture. For further hot chocolatey decadence, sandwich two biscuits together with Marshmallow Fluff - scrumptious!

Note: the large chocolate chunks in these cookies means the dough will be fairly thick and slightly uneven when rolled out and the final result will be a little bumpy with oozy marshmallow patches, so I'd advise using a simple cutter rather than an intricately shaped one for this recipe.


INGREDIENTS - makes approx. 20 biscuits depending on size of cutter
  • 8 oz plain flour
  • 1 oz cocoa
  • 1 oz hot chocolate powder
  • 1 tsp Horlicks (or other malt drink powder)
  • 1 oz icing sugar
  • 6 oz margarine/butter
  • 1 tsp vanilla extract
  • 4 oz milk chocolate chips or cut-up chunks
  • Handful of marshmallows snipped into small bits
  • 0.5 tbsp instant ground coffee dissolved in approx. 0.5 tbsp boiling water
METHOD
  1. Boil the kettle and pour about half a tbsp water over half a tbsp instant ground coffee and set aside.
  2. Whisk the margarine/butter and icing sugar together until combined.
  3. Add the flour, cocoa, hot chocolate powder, Horlicks, chocolate chunks and bits of marshmallow and mix briefly.
  4. Add the vanilla extract and prepared coffee then use your hands to squash the mixture together to form a ball of dough. If it's too sticky, add a bit more flour.
  5. Wrap the dough in clingfilm or a freezer bag and chill in the fridge for about 15-20 minutes.
  6. Place the ball of dough onto a large clean sheet of baking parchment then place another sheet on top and roll out with a rolling pin until about 1.5cm thick, depending on the size of the chocolate pieces (alternatively, you could roll the dough out on a floured surface but this may spoil the colour of the biscuits a bit).
  7. Cut out as many biscuits as possible using your cutter of choice (I used a flower shape) and place onto a parchment-lined baking tray then squish the offcuts of dough together, re-roll and repeat the process until all the dough is used up.
  8. Pop in the oven and bake at 180 degrees C for about 8-10 minutes then transfer onto a wire rack. This is the part where I'd normally say leave to cool but don't leave them too long as they're delicious while still warm from the oven - just beware of molten marshmallow!

Sunday, 8 December 2013

Red Velvet Star Biscuits

I haven't updated my little blog in a while due to being busy but now we've officially entered the most wonderful time of the year for cooking I've been squeezing in lots of festive baking.

These decadent biccies have got to be one of my all time favourite recipes and more than make up for my first (and so far only) attempt at red velvet cake being a disaster. They contain quite a large amount of red gel colouring and icing sugar, plus buttermilk and egg, so they're not the cheapest cookies to make but they look and taste fantastic and are a perfect luxurious treat for Christmas, Valentine's Day or any other special occasion, or as a gift. I wish I'd taken photo which showed their beautiful dark red colour better as it makes the cookies look very distinctive even without decoration, although I added Dr Oetker Gold Shimmer Spray for an extra festive sparkly sheen. These would also be delicious sandwiched together with some cream cheese frosting for an even more authentic red velvet experience.

If, like me, you don't want to buy buttermilk (it's not very widely available here in the UK), I found a great tip online showing you how to make your own by simply adding a dash of white wine vinegar or lemon juice to milk and leaving it to curdle for a few minutes. Et voila - bona fide red velvety goodness in biscuit form!

This recipe is an adapted version of an American one I found here: http://www.sweetsugarbelle.com/2012/02/red-velvet-roll-outs-recipe/


INGREDIENTS - makes approx. 40 biscuits depending on size of cutter

  • 4 oz butter/margarine
  • 6 oz icing sugar
  • 9 oz plain flour
  • 0.5 egg
  • 2 oz cocoa
  • 3 tsp buttermilk (or 3 tsp milk + 1 tsp white wine vinegar or lemon juice)
  • 1.5 tbsp vanilla extract
  • 0.5 tsp baking powder
  • 1.5 tbsp red gel food colouring (NOT the liquid kind as this won't work!)
  • Dr Oetker Gold Shimmer Spray (optional)
METHOD
  1. If making buttermilk as outlined above, pour the white wine vinegar or lemon juice into the milk and set aside for a few minutes.
  2. Whisk the butter/margarine and icing sugar until combined.
  3. Stir in the egg, vanilla extract, buttermilk then add the flour, cocoa and baking powder and mix briefly.
  4. Add the gel food colouring a teaspoon at a time and mix until the mixture turns a deep blood-like red shade then squash together with your hands to form a ball of dough. If it's too sticky, add some more flour.
  5. Wrap the dough in clingfilm or a freezer bag and chill in the fridge for about 15-20 minutes until fairly firm.
  6. Place the ball of dough on a large clean sheet of baking parchment then place another sheet over the top and roll out with a rolling pin until about 1cm thick.*
  7. Cut out as many biscuits as possible with your cookie cutter of choice (I used a star shape) and place onto a parchment-lined baking tray (they don't spread out much when cooking so they can be placed fairly close together). Squish the offcuts of dough together and re-roll and repeat the process until all the dough is used up.
  8. Pop in the oven and bake at 180 degrees C for about 8 minutes then transfer onto a wire rack and leave to cool.
  9. If you want a gold sheen effect as in the photo, hold the can about 10cm away from the biscuits and spray each one with the Shimmer Spray then leave to dry.
*You could just sprinkle flour onto the surface to prevent the rolling pin sticking but this ruins the bold colour of the dough when baking.


Sunday, 20 October 2013

Custard Creams & Strawberry Milkshake Creams

Although I try, as a rule I'm not one for aesthetic neatness and elegance when baking. Despite numerous attempts, my piping is never up to scratch and my cookies, though tasty, are always sloppy and uneven (in fact, this is the primary reason I have still not yet plucked up the courage to have a go at posh French macarons despite having bought a packet of ground almonds for this purpose over a month ago). But I impressed myself with these lovely little biscuits which were a bit of a labour of love. The secret of their prettiness is that the dough barely puffs up at all during baking which means the biscuits keep their beautiful even shape.

Although it took me a while to lovingly craft each button using a round scone cutter, a tiny espresso cup and a straw, these colourful treats certainly aren't complicated to make. And they were certainly worth the extra time as they received an abundance of compliments on both taste and appearance - in fact, Edd Kimber himself (whose recipe I used for the custard creams) saw them on Twitter and said they were fantastic! Praise indeed :)

The pink strawberry milkshake creams were an original invention of mine which I'm rather proud of though I say so myself - I simply followed the same recipe as I did for the custard creams but substituted the custard powder and vanilla extract for strawberry milkshake powder and strawberry extract respectively. The result was utterly delicious and I will definitely be making them again!

If you don't have the time or patience to make buttons, just use your favourite cookie cutters like I did for the mini stars and hearts below. To make a Bourbon cream-esque variation, you could substitute the custard/strawberry milkshake powder for chocolate milkshake powder or cocoa.


The yellow custard creams were made using Edd Kimber's fab recipe which can be found here - http://theboywhobakes.co.uk/2011/06/custard-creams/ - so I'm just going to post the recipe for my strawberry milkshake cream version.

Strawberry Milkshake Creams

INGREDIENTS - yield depends on the size and shape of cookie cutter used but the below quantities resulted in the number of pink biscuits seen in the photo above

For the biscuits:
  • 230g plain flour
  • 50g icing sugar
  • 50g strawberry milkshake powder (I used Hello Kitty brand but any will do!)
  • 180g margarine/butter
  • 1 tsp strawberry extract
  • Splash of red food colouring

    + cookies cutters of your choice or a round cutter, an espresso cup & a plastic straw if you want to make buttons like in the photo
For the filling:
  • 100g icing sugar
  • 25g butter (unsalted if preferred)
  • 1.5 tbsp strawberry milkshake powder
  • Splash of milk
  • 0.5 tsp strawberry extract
  • Drop of red food colouring
METHOD

For the biscuits:
  1. Line two large rectangular baking trays with parchment.
  2. Place the flour, icing sugar and strawberry milkshake powder into a large mixing bowl then add the margarine/butter and strawberry extract.
  3. Rub the fat into the dry ingredients so that crumbs form and then squish together into a large ball of dough. If it's too sticky, add a little more flour. If it's too dry and crumbly, add a little milk.
  4. Add the red food colouring, a tiny splash at a time, and knead the dough in the bowl until it turns your desired shade of pink.
  5. Take the dough out of the bowl, wrap tightly in clingfilm and leave in the fridge to chill for about 20 minutes to half an hour.
  6. Sprinkle flour over your work surface to prevent sticking then roll the pink dough out until it's roughly 1cm in thickness (remember you'll be sandwiching them together two at a time so you don't want them too thick or they won't be pleasant to eat unless you have an extremely massive gob!)
  7. Cut out as many circles as possible using the round cookie cutter and stamp each circle with the espresso cup, firmly enough that it makes a definite indent but not so hard that it cuts through the dough. Then use the end of a plastic straw to stamp out four tiny circles in the middle of each biscuit to make a button, transferring each one onto the baking trays as you go.
  8. Squish all the off-cuts together then re-roll the dough and repeat the process. If you're lazy like me, cut out other small simple shapes such as hearts or stars once you've made 20 buttons.
  9. Pop in the oven and bake at about 180 degrees C for 10-12 minutes until the bottoms have started to colour very slightly at the edges then transfer onto a wire rack and leave to cool.
For the filling:
  1. Place the butter and strawberry extract into a bowl then add the icing sugar and strawberry milkshake powder gradually while stirring/whisking. Add a splash of milk and continue to stir/whisk until a smooth, spreadable mixture has formed.
  2. Add the red food colouring a tiny drop at a time and stir until the mixture turns your desired shade of pink (you'll only need a very tiny bit).
  3. Spread a small blob of the icing onto the back of one of the pink biscuits using a palette knife then sandwich together with another biscuit of the same shape and repeat until they've all been paired up.
Edit: I also used Edd's custard cream recipe to make these cute jammy heart biscuits - just make imprints in the dough with your thumb then fill with raspberry or strawberry jam :)