Monday 9 December 2013

Hot Chocolate Biscuits

My original attempt at hot chocolate biscuits were a sub-par batch of dry, cakey chocolate cookies from a recipe I found online so I went back to the drawing board and invented my own version which keeps the hot chocolate powder, generous chocolate chunks and gooey marshmallow but uses icing sugar in place of caster sugar and plain flour instead of self-raising. This creates a more even and less puffed-up biscuit without making them hard and brittle.

The combination of chunky milk chocolate pieces and chewy marshmallow inside a rich, dark cocoa biscuit makes for a delicious taste and texture. For further hot chocolatey decadence, sandwich two biscuits together with Marshmallow Fluff - scrumptious!

Note: the large chocolate chunks in these cookies means the dough will be fairly thick and slightly uneven when rolled out and the final result will be a little bumpy with oozy marshmallow patches, so I'd advise using a simple cutter rather than an intricately shaped one for this recipe.


INGREDIENTS - makes approx. 20 biscuits depending on size of cutter
  • 8 oz plain flour
  • 1 oz cocoa
  • 1 oz hot chocolate powder
  • 1 tsp Horlicks (or other malt drink powder)
  • 1 oz icing sugar
  • 6 oz margarine/butter
  • 1 tsp vanilla extract
  • 4 oz milk chocolate chips or cut-up chunks
  • Handful of marshmallows snipped into small bits
  • 0.5 tbsp instant ground coffee dissolved in approx. 0.5 tbsp boiling water
METHOD
  1. Boil the kettle and pour about half a tbsp water over half a tbsp instant ground coffee and set aside.
  2. Whisk the margarine/butter and icing sugar together until combined.
  3. Add the flour, cocoa, hot chocolate powder, Horlicks, chocolate chunks and bits of marshmallow and mix briefly.
  4. Add the vanilla extract and prepared coffee then use your hands to squash the mixture together to form a ball of dough. If it's too sticky, add a bit more flour.
  5. Wrap the dough in clingfilm or a freezer bag and chill in the fridge for about 15-20 minutes.
  6. Place the ball of dough onto a large clean sheet of baking parchment then place another sheet on top and roll out with a rolling pin until about 1.5cm thick, depending on the size of the chocolate pieces (alternatively, you could roll the dough out on a floured surface but this may spoil the colour of the biscuits a bit).
  7. Cut out as many biscuits as possible using your cutter of choice (I used a flower shape) and place onto a parchment-lined baking tray then squish the offcuts of dough together, re-roll and repeat the process until all the dough is used up.
  8. Pop in the oven and bake at 180 degrees C for about 8-10 minutes then transfer onto a wire rack. This is the part where I'd normally say leave to cool but don't leave them too long as they're delicious while still warm from the oven - just beware of molten marshmallow!

Sunday 8 December 2013

Red Velvet Star Biscuits

I haven't updated my little blog in a while due to being busy but now we've officially entered the most wonderful time of the year for cooking I've been squeezing in lots of festive baking.

These decadent biccies have got to be one of my all time favourite recipes and more than make up for my first (and so far only) attempt at red velvet cake being a disaster. They contain quite a large amount of red gel colouring and icing sugar, plus buttermilk and egg, so they're not the cheapest cookies to make but they look and taste fantastic and are a perfect luxurious treat for Christmas, Valentine's Day or any other special occasion, or as a gift. I wish I'd taken photo which showed their beautiful dark red colour better as it makes the cookies look very distinctive even without decoration, although I added Dr Oetker Gold Shimmer Spray for an extra festive sparkly sheen. These would also be delicious sandwiched together with some cream cheese frosting for an even more authentic red velvet experience.

If, like me, you don't want to buy buttermilk (it's not very widely available here in the UK), I found a great tip online showing you how to make your own by simply adding a dash of white wine vinegar or lemon juice to milk and leaving it to curdle for a few minutes. Et voila - bona fide red velvety goodness in biscuit form!

This recipe is an adapted version of an American one I found here: http://www.sweetsugarbelle.com/2012/02/red-velvet-roll-outs-recipe/


INGREDIENTS - makes approx. 40 biscuits depending on size of cutter

  • 4 oz butter/margarine
  • 6 oz icing sugar
  • 9 oz plain flour
  • 0.5 egg
  • 2 oz cocoa
  • 3 tsp buttermilk (or 3 tsp milk + 1 tsp white wine vinegar or lemon juice)
  • 1.5 tbsp vanilla extract
  • 0.5 tsp baking powder
  • 1.5 tbsp red gel food colouring (NOT the liquid kind as this won't work!)
  • Dr Oetker Gold Shimmer Spray (optional)
METHOD
  1. If making buttermilk as outlined above, pour the white wine vinegar or lemon juice into the milk and set aside for a few minutes.
  2. Whisk the butter/margarine and icing sugar until combined.
  3. Stir in the egg, vanilla extract, buttermilk then add the flour, cocoa and baking powder and mix briefly.
  4. Add the gel food colouring a teaspoon at a time and mix until the mixture turns a deep blood-like red shade then squash together with your hands to form a ball of dough. If it's too sticky, add some more flour.
  5. Wrap the dough in clingfilm or a freezer bag and chill in the fridge for about 15-20 minutes until fairly firm.
  6. Place the ball of dough on a large clean sheet of baking parchment then place another sheet over the top and roll out with a rolling pin until about 1cm thick.*
  7. Cut out as many biscuits as possible with your cookie cutter of choice (I used a star shape) and place onto a parchment-lined baking tray (they don't spread out much when cooking so they can be placed fairly close together). Squish the offcuts of dough together and re-roll and repeat the process until all the dough is used up.
  8. Pop in the oven and bake at 180 degrees C for about 8 minutes then transfer onto a wire rack and leave to cool.
  9. If you want a gold sheen effect as in the photo, hold the can about 10cm away from the biscuits and spray each one with the Shimmer Spray then leave to dry.
*You could just sprinkle flour onto the surface to prevent the rolling pin sticking but this ruins the bold colour of the dough when baking.


Sunday 20 October 2013

Custard Creams & Strawberry Milkshake Creams

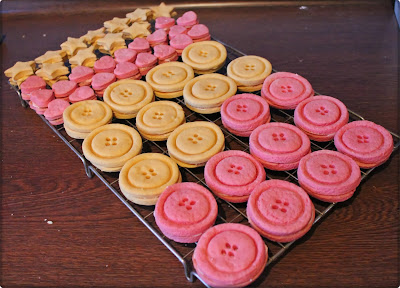
Although I try, as a rule I'm not one for aesthetic neatness and elegance when baking. Despite numerous attempts, my piping is never up to scratch and my cookies, though tasty, are always sloppy and uneven (in fact, this is the primary reason I have still not yet plucked up the courage to have a go at posh French macarons despite having bought a packet of ground almonds for this purpose over a month ago). But I impressed myself with these lovely little biscuits which were a bit of a labour of love. The secret of their prettiness is that the dough barely puffs up at all during baking which means the biscuits keep their beautiful even shape.

Although it took me a while to lovingly craft each button using a round scone cutter, a tiny espresso cup and a straw, these colourful treats certainly aren't complicated to make. And they were certainly worth the extra time as they received an abundance of compliments on both taste and appearance - in fact, Edd Kimber himself (whose recipe I used for the custard creams) saw them on Twitter and said they were fantastic! Praise indeed :)

The pink strawberry milkshake creams were an original invention of mine which I'm rather proud of though I say so myself - I simply followed the same recipe as I did for the custard creams but substituted the custard powder and vanilla extract for strawberry milkshake powder and strawberry extract respectively. The result was utterly delicious and I will definitely be making them again!

If you don't have the time or patience to make buttons, just use your favourite cookie cutters like I did for the mini stars and hearts below. To make a Bourbon cream-esque variation, you could substitute the custard/strawberry milkshake powder for chocolate milkshake powder or cocoa.


The yellow custard creams were made using Edd Kimber's fab recipe which can be found here - http://theboywhobakes.co.uk/2011/06/custard-creams/ - so I'm just going to post the recipe for my strawberry milkshake cream version.

Strawberry Milkshake Creams

INGREDIENTS - yield depends on the size and shape of cookie cutter used but the below quantities resulted in the number of pink biscuits seen in the photo above

For the biscuits:
  • 230g plain flour
  • 50g icing sugar
  • 50g strawberry milkshake powder (I used Hello Kitty brand but any will do!)
  • 180g margarine/butter
  • 1 tsp strawberry extract
  • Splash of red food colouring

    + cookies cutters of your choice or a round cutter, an espresso cup & a plastic straw if you want to make buttons like in the photo
For the filling:
  • 100g icing sugar
  • 25g butter (unsalted if preferred)
  • 1.5 tbsp strawberry milkshake powder
  • Splash of milk
  • 0.5 tsp strawberry extract
  • Drop of red food colouring
METHOD

For the biscuits:
  1. Line two large rectangular baking trays with parchment.
  2. Place the flour, icing sugar and strawberry milkshake powder into a large mixing bowl then add the margarine/butter and strawberry extract.
  3. Rub the fat into the dry ingredients so that crumbs form and then squish together into a large ball of dough. If it's too sticky, add a little more flour. If it's too dry and crumbly, add a little milk.
  4. Add the red food colouring, a tiny splash at a time, and knead the dough in the bowl until it turns your desired shade of pink.
  5. Take the dough out of the bowl, wrap tightly in clingfilm and leave in the fridge to chill for about 20 minutes to half an hour.
  6. Sprinkle flour over your work surface to prevent sticking then roll the pink dough out until it's roughly 1cm in thickness (remember you'll be sandwiching them together two at a time so you don't want them too thick or they won't be pleasant to eat unless you have an extremely massive gob!)
  7. Cut out as many circles as possible using the round cookie cutter and stamp each circle with the espresso cup, firmly enough that it makes a definite indent but not so hard that it cuts through the dough. Then use the end of a plastic straw to stamp out four tiny circles in the middle of each biscuit to make a button, transferring each one onto the baking trays as you go.
  8. Squish all the off-cuts together then re-roll the dough and repeat the process. If you're lazy like me, cut out other small simple shapes such as hearts or stars once you've made 20 buttons.
  9. Pop in the oven and bake at about 180 degrees C for 10-12 minutes until the bottoms have started to colour very slightly at the edges then transfer onto a wire rack and leave to cool.
For the filling:
  1. Place the butter and strawberry extract into a bowl then add the icing sugar and strawberry milkshake powder gradually while stirring/whisking. Add a splash of milk and continue to stir/whisk until a smooth, spreadable mixture has formed.
  2. Add the red food colouring a tiny drop at a time and stir until the mixture turns your desired shade of pink (you'll only need a very tiny bit).
  3. Spread a small blob of the icing onto the back of one of the pink biscuits using a palette knife then sandwich together with another biscuit of the same shape and repeat until they've all been paired up.
Edit: I also used Edd's custard cream recipe to make these cute jammy heart biscuits - just make imprints in the dough with your thumb then fill with raspberry or strawberry jam :)


Sunday 1 September 2013

Best Ever Jack Daniel's Brownies

Oh em gee. Seriously...there are no words to describe how utterly delicious these decadent chunks of chocolate heaven are! Just writing about them is making me crave one...

My previous attempts at brownies were pleasant enough but always seemed more like a moist chocolate cake and never turned out anything like bakery bought ones with their glorious gooey centres and thin top crusts. Then a friend from work sent me her recipe that used oil rather than butter and this, without a doubt, made all the difference in creating the perfect texture. Adding the Jack Daniel's whiskey was my little twist and the end result is simply sublime and devastatingly addictive. Milk cooking chocolate gave a lovely fudgy flavour but dark chocolate would also work if you prefer.

Please don't let the wrinkly, sunken appearance of the brownies when they come out of the oven put you off - I promise you the taste will be amazing!!


(Apologies for the rubbish photo, took it on my BlackBerry...)

INGREDIENTS
  • 215g granulated/caster sugar
  • 2 eggs
  • 70g self-raising flour
  • 120ml cooking oil
  • 150g milk cooking chocolate
  • 4 tbsp cocoa powder
  • 1 tbsp Jack Daniel's whiskey
  • 3/4 tbsp vanilla extract
METHOD
  • Grease the baking tin with margarine/butter or line with baking parchment.
  • Briefly whisk the sugar, eggs, oil and vanilla extract together in a large mixing bowl.
  • Chop the chocolate into small chunks and melt in a heatproof bowl over a saucepan of hot water or place in the microwave and heat in blasts of about 1 minute until smooth, then pour into the mixing bowl.
  • Fold the flour, cocoa and Jack Daniel's into the mixture and pour into the lined tin.
  • Pop in the oven and bake at 180 degrees C for about 20 minutes until a cocktail stick inserted into the brownies comes out pretty much clean then leave to cool.
  • Cut the brownies into squares using a sharp knife and devour while moaning pleasurably. Easy peasy!

Sunday 28 July 2013

Plimmsberry Cupcakes

I've been on a bit of a baking hiatus recently due to the horrendously sweltering weather and so I've been indulging my cravings for homemade goodies by whipping up simple no-cook rocky road and cheesecake, but I realised I forgot to post the recipe for these lovely summery and quintessentially British cupcakes I made back when Wimbledon fever was abound here in the UK and I could still switch on the oven without melting. 

The Pimms jam filling was an impulse invention of mine that turned out deliciously but I don't think I'll be trying meringue icing again a hurry. Although it was light and tasty and significantly lower in fat than standard buttercream frosting, it was a bit of a fiddly faff-fest to make, and after being piped onto the cakes it shrunk within a few hours. Therefore, I strongly recommend that you don't frost the cakes until just before you serve them! I also ended up with an obscene amount left over; the recipe I originally used said it was just enough for 12 cupcakes but I've reduced the quantities below to a (hopefully) a more accurate estimate, although obviously it depends how much of the icing you want to top each cake with.

I have to confess that the redcurrants out of the garden were far too sharp to be edible and were just for decorative purposes only but I thought they made a rather spiffy finishing touch skewered on the wee cocktail sticks. Cheers!


INGREDIENTS - makes approx. 12 small cupcakes

For the cakes:
  • 4 oz self-raising flour
  • 4 oz caster sugar
  • 4 oz margarine/butter
  • 2 eggs
  • 1 tsp vanilla extract
  • 1/4 tsp baking powder
For the jammy 'Plimmsberry' filling:
  • 6 tsp (approx.) strawberry jam
  • 6 tsp (approx.) plum jam
  • 20 ml (approx.) Pimms
For the icing:
  • 1 or 2 egg whites (depending on how much icing you want to cover the cakes in)
  • 2 or 4 oz caster sugar
  • 1/2 or 1 tsp vanilla extract
+ 12 cocktail sticks + 24 redcurrants (optional)

METHOD

For the cakes:
  1. Line a baking tray with 12 paper cases.
  2. Whisk the margarine/butter and sugar together in a large mixing bowl until pale then whisk in the eggs.
  3. Fold in the flour, baking powder and vanilla extract until a batter of a soft dropping consistency has formed.
  4. Drop the mixture into the cake cases using a teaspoon until they're each about two thirds full.
  5. Pop in the oven and bake at 180 degrees C for about 12-15 minutes until a cocktail stick inserted into the sponge comes out clean.
  6. When baked, place on a wire rack and leave to cool. At this stage the cakes can be frozen for decorating at a later date if you wish.
For the filling/icing:
  1. Roughly mix the two types of jam and the Pimms together in a small bowl.
  2. Using a teaspoon or small sharp knife, carefully cut a small hole (about 2cm deep by 2cm wide) in the top of each cupcake. Don't discard the bits you've cut out!
  3. Drop about a teaspoon of the 'Plimmsberry' jam into each hole and then gently push the sponge part that was cut out back into each one.
  4. To create the meringue icing just before serving, separate the whites of 1 or 2 eggs into a heatproof bowl which can sit over the top of a saucepan of hot water without touching the water, and put the yolks to one side (these can be used to make choc mousse or eggy bread or something later!)
  5. Boil the kettle and fill the saucepan with a small volume of water and leave to cool slightly on the hob (don't turn it on yet!) while beginning to whisk the egg whites on a high speed until they begin to stiffen and form peaks - this should be done for a minimum of 3 minutes.
  6. Switch the hob onto a LOW heat and place the bowl of egg whites onto the saucepan, ensuring that the hot water does not touch the bottom and that the water does not boil, then begin whisking on high speed again while gradually adding the sugar and vanilla extract.
  7. Continue to whisk thoroughly until all the sugar has dissolved - this will take at least 5 minutes or so. If, like me, you don't own a fancy sugar thermometer, you can test to see if the sugar's dissolved by pinching a small amount of the mixture between your fingers - if it feels gritty it needs further whisking. At this point the mixture may turn flat and runny but don't panic, just keep on whisking and it will thicken again.
  8. Once all the sugar has dissolved and the egg whites have formed stiff, glossy peaks, switch the hob off and transfer the meringue into a piping bag with the nozzle of your choice (I used a star attachment) then pipe swirls onto each cake.
  9. Spear two of the redcurrants onto each cocktail stick then insert into the cakes if you wish.
Remember, the icing doesn't keep well so make sure you scoff right away :)


Sunday 30 June 2013

Golden Caramac Cupcakes

Seriously, who doesn't love Caramac?? I'm so glad you can still buy these deliciously retro and unique golden caramel flavoured chocolate bars in most shops. This recipe is so easy but great if you want something a bit different from normal chocolate cupcakes, and the mere smell will have people salivating in anticipation! Adding half dark brown sugar to the batter is a simple twist on a regular cupcake but the result is a divinely butterscotchy flavour which really compliments the Caramac frosting. The creation of these babies coincided with Bargain Baking Find of the Year, courtesy of my mum - she picked up a can of Dr Oetker's amazing Golden Shimmer Spray for 49p instead of a whopping £3.99 just because the main cap was missing! I don't think I could justify paying full whack for it but the metallic sheen it creates is just fantastic and perfect for this recipe, although the cakes are just as delicious without it.


INGREDIENTS - makes approx. 12

For the cakes:
  • 4 oz self-raising flour
  • 2 oz caster sugar
  • 2 oz dark brown sugar (sifted if preferred)
  • 4 oz margarine/butter
  • 2 eggs
  • 1 tsp vanilla extract
  • 1/4 tsp baking powder
For the icing:
  • 4 oz butter (unsalted if preferred)
  • 8 oz icing sugar
  • 3 30g Caramac bars
  • Dr Oetker Gold Shimmer Spray (optional)
METHOD

For the cakes:
  1. Line a baking tray with 12 paper cases.
  2. Whisk the margarine/butter and both lots of sugar* together in a mixing bowl then whisk in the eggs.
  3. Fold in the flour, baking powder and vanilla extract until a batter of a soft dropping consistency has formed.
  4. Drop the mixture into the paper cases using a teaspoon until they're each about two thirds full.
  5. Pop in the oven and bake at 180 degrees C for about 12-15 minutes until a cocktail stick inserted into the sponge comes out clean.
  6. When baked, place on a wire rack and leave to cool. At this stage the cakes can be frozen for decorating at a later stage if you wish.
For the icing:
  1. Break one of the Caramac bars up into a heatproof bowl and place over a saucepan of simmering water without letting the bottom of the bowl touch the water, or heat on short bursts of LOW heat in the microwave, until completely melted.
  2. Add the butter and stir/whisk while gradually adding the icing sugar until a thick, fluffy mixture has formed. If it's too runny, add some more icing sugar.
  3. Spread onto the cakes using a palette knife or pipe on using the nozzle of your choice, then spray with the gold Shimmer Spray (I found this works best when keeping the can about 10 ins away from the cake).
  4. Carefully break or cut the remaining two Caramac bars into 12 rectangular sections and push one onto the top of each cake as a neat finishing touch.
* You may find that the dark brown sugar stays a bit lumpy; I actually prefer it like this as biting into melty specks of it in the baked cupcake is rather heavenly IMO, but if you want a more even mixture sieve the brown sugar before adding it.

Friday 14 June 2013

Lemon Sunflower Cupcakes

I made these lovely summery cupcakes for Sunday Baking Club's (@SundayBakeClub on Twitter - go follow them for fabulous baking fun!) 'Citrus Zing' themed competition and they received a lot of compliments from other entrants :) The pretty sunflower design also provoked much cooing in admiration when I took them into work! I'd never used lemon extract before but my mum and I were given a free bottle when we went to the Good Food show back in November and I have to say I was very pleasantly surprised by the delicate citrus flavour it gave to the buttercream without making it taste at all synthetic. Both my dad and brother said that they were not fans of lemon but that these cakes were delicious and not too overwhelmingly 'citrussy'.

The icing technique is a heck of a lot simpler and quicker than it looks - in fact, I personally find it much easier to do than regular swirly piping. Chocolate buttons are a simple and yummy way of creating the centre of the sunflower but you could also add black/chocolate icing using the same piping technique as the petals for a more textured look. The ladybirds were a last minute addition but they make a nice colourful finishing touch and are so easy to create!

When I bake batches of cupcakes to share, I've recently started to include some mini ones because a) they're a bit more diet-friendly to those who are reluctant to splurge and b) I think they're just so cute! So I've included these as part of the recipe but obviously you can just stick to normal sized cupcakes if you don't have the required equipment.


INGREDIENTS - makes approx. 12 cupcakes + 12 mini cupcakes or 18 standard cupcakes

For the cakes:
  • 6 oz self-raising flour
  • 6 oz caster sugar
  • 6 oz margarine/butter
  • 3 eggs
  • 1/4 tsp baking powder
  • 2 tsp lemon extract
For the icing/flower centres/ladybirds:
  • 10 oz icing sugar
  • 5 oz butter (unsalted if preferred)
  • 1 tsp lemon extract
  • 2 tsp yellow food colouring*
  • 12 large milk chocolate buttons + 12 small milk chocolate buttons
  • A few red Smarties or M&Ms
  • Small tube dark chocolate or black writing icing
METHOD

For the cakes:
  1. Line one baking tray with 12 standard paper cake cases and another smaller muffin tray with 12 mini paper cupcake/muffin cases.^
  2. Whisk the margarine/butter and sugar together in a large mixing bowl until pale then whisk in the eggs.
  3. Fold in the flour, baking powder and lemon extract until a batter of a soft dropping consistency has formed.
  4. Drop the mixture into all of the cake cases until they're each about two thirds full.
  5. Pop the larger cupcakes into the oven at 180 degrees C for about 12-15 minutes until a cocktail stick inserted into the sponge comes out clean, then do the same with the mini cupcakes for about 10-12 minutes.
  6. When baked, place on a wire rack and leave to cool. At this stage the cakes can be frozen for decorating at a later stage if you wish.
For the icing/flower centres/ladybirds:
  1. Place the butter and lemon extract into a bowl and stir/whisk while gradually adding the icing sugar until a thick, fluffy mixture has formed.
  2. Spoon the icing into a piping bag with a rope or star nozzle attached and pipe little rosettes in circles around each cake, working from the outside then moving inwards to the centre, then firmly push a large chocolate button into the middle. Do the same for the mini cupcakes but using small chocolate buttons.
  3. Use the dark chocolate/black writing icing tube to pipe a 'T' shape onto each Smartie/M&M then add two dots either side of each line to create the ladybirds' eyes and spots, as per the photo. Place randomly onto your chosen cakes.
* As a rule, less is more when it comes to colouring icing but I used Asda's standard liquid yellow food dye and found I needed quite a lot just to create a pale yellow shade. These measurements may vary depending on which type/brand of colouring you use and how pale or dark you want the end result to be so I'd advise adding a little at a time until you get the desired hue.

I'm not sure what the correct type of ovenware would be for these so I used a silicone baking tray with 12 holes designed for mini scones placed on top of a flat metal baking tray for support. This gave the mini cakes a nice even shape as they couldn't expand too much. For added structure and support, a good tip is to double layer the mini muffin cases (i.e. two per cake) - the extra ones can then be removed after baking and re-used.

Edit: I used this recipe to create my stepgrandad's birthday cake - he absolutely loved it! :)


Saturday 8 June 2013

Cream Soda Cupcakes

This is one of my go-to cake recipes as they're so easy to make but never fail to impress. I've always been a fan of the unusual but lovely fragrant vanilla taste of cream soda and I think it's the perfect addition to a cupcake, especially the icing. In fact, I think they should manufacture a perfume with the scent of these cupcakes - it's divine! The little straws were a nifty last minute brainwave for a simple but eye-catching finishing touch and I'm rather proud of them though I say so myself :)

Just an aside, but cream soda makes a delicious addition to the raspberry ripple ice cream flavour squash I mentioned in my post here: http://cloudninepointone.blogspot.co.uk/2013/05/raspberry-ripple-ice-cream-cupcakes.html - perfect with ice and a straw on a hot summer's day :)


INGREDIENTS - makes approx. 12 

For the cakes:

  • 4 oz self-raising flour
  • 4 oz caster sugar
  • 4 oz margarine/butter
  • 2 eggs
  • 1/4 tsp baking powder
  • 2 tbsp cream soda
  • 2 tsp vanilla extract
For the icing:
  • 5 oz butter (unsalted if preferred)
  • 10 oz icing sugar
  • 2 tsp cream soda
  • 1 tsp vanilla extract

    + 4 stripey plastic straws in colours of your choice (optional)
METHOD

For the cakes:
  1. Line a baking tray with 12 paper cake cases.
  2. Whisk the margarine/butter and sugar together in a large mixing bowl until pale then whisk in the eggs.
  3. Fold in the flour, baking powder, vanilla extract and cream soda until a batter of a soft dropping consistency has formed. If it's too runny, add a little more flour.
  4. Drop the mixture into the paper cases using a teaspoon until they're each about two thirds full.
  5. Pop in the oven and bake at 180 degrees C for about 12-15 minutes until a cocktail stick inserted into the sponge comes out clean.
  6. When baked, place on a wire rack and leave to cool. At this stage the cakes can be frozen for icing at a later date if you wish. 
For the icing:
  1. Place the butter, vanilla extract and cream soda into a bowl and stir/whisk while gradually adding the icing sugar until a thick, fluffy mixture has formed. If it's too runny, add some more icing sugar. The longer you whisk it for, the whiter the icing will become.
  2. Spoon the icing into a piping bag with a nozzle of your choice attached (I used a large circular one) and pipe onto the cakes or simply spread it on using a palette knife.
  3. Use scissors to cut the four plastic straws into pieces of about 3-4ins in length and push one piece into the side of each cake for a neat finishing touch. You could also add some rainbow sprinkles if you fancy.

Cheer-Me-Up Angel Cake

Of all the cakes I've made this is certainly not one of the most elegant - I even overcooked the sponges (although I seem to have mastered the art of nice even cupcakes my large round cakes always come out abysmally) - but after a horrible week of suffering from a severe chest infection and generally feeling rubbish, by the weekend I had a serious craving for a massive dose of unapologetically sinful sweet, spongey, jammy, melt-in-the-mouth, no-frills CAKE. CAKE just for me!! And the result was blissfully delicious, though unfortunately so much so that my family managed to devour the majority of it! I used my favourite vanilla buttercream icing and, being a sucker for girly prettiness, I made pink and yellow angel cake sponges topped off with rainbow sprinkles for added cheeriness. As I said, this is by no means the most sophisticated of cakes but it's super easy and certainly won't fail to raise a smile!


INGREDIENTS - makes 2 sponge layers of 8in/10cm diameter

For the cake:
  • 8 oz self-raising flour
  • 8 oz caster sugar
  • 8 oz margarine/butter
  • 4 eggs
  • 1/4 teaspoon baking powder
  • 2 tsp vanilla extract
  • Few drops red food colouring
For the filling/icing:
  • 2 tbsp (approx.) jam of your choice (I used strawberry)
  • 10 oz icing sugar
  • 2 oz cream cheese (at room temperature, full-fat works best)
  • 2 oz butter (unsalted if preferred)
  • 1 tsp vanilla extract
  • Coloured sprinkles, to decorate
METHOD

For the cake:
  1. Grease two round cake pans of around 8in/10cm in diameter or line with baking parchment.
  2. Whisk the margarine/butter and sugar together in a large mixing bowl until pale then whisk in the eggs.
  3. Fold in the flour, baking powder and vanilla extract until a batter of a soft dropping consistency has formed.
  4. Pour half of the mixture into one of the cake pans - it shouldn't be any more than two thirds full.
  5. Add a few drops of red food colouring to the remaining batter until it has turned a pale pink colour. Don't worry too much if it doesn't look the perfect shade, it will look different when baked.
  6. Pour the mixture into the second cake pan - again, it shouldn't be any more than two thirds full (if you have any leftover batter at this stage why not fill a few cupcake cases? :)
  7. Pop in the oven and bake at 180 degrees C for about 15-18 minutes until a cocktail stick inserted into the sponge comes out clean.
  8. When baked, remove the cakes from the pans (I still haven't mastered the art of this!!) and leave to cool on a wire rack. At this stage the sponges can be frozen for assembling and decorating at a later date if you wish.
For the filling & icing:
  1. Whisk the butter, cream cheese and vanilla extract together in a bowl and then gradually add the icing sugar until a pale spreadable mixture has formed. If too stiff, add a little milk and if too runny, add some more icing sugar.
  2. If the sponges have risen up too much in the middle, saw off the tops using a sharp serated knife so that they're nice and flat, otherwise they'll be horribly wobbly when stacked together. See below for an idea of what to do with the offcuts!
  3. Place the yellow sponge on something flat that it will not need to be moved from when completed, e.g. a cake board, tray or tin lid (moving the finished cake is best avoided if possible!), then spread a thin layer of jam all over the top of the yellow sponge followed by a thin layer of the buttercream icing. If any bits of the sponges have fallen off these can be 'glued' back on with jam :)
  4. Firmly place the pink sponge on top then spread the buttercream icing all over the assembled cake with a palette knife, smoothing out the top and sides as you go, while attempting to resist repeatedly sampling its fluffy, vanilla-y deliciousness.
  5. Decorate with rainbow sprinkles for some extra colour.
Leftover sponge and icing...?

Simply layer torn up chunks of pink and yellow sponge and jam in small individual containers (e.g. ramekins or teacups) then top with icing and sprinkles to make some cute little trifle-style angelic desserts!


Wednesday 29 May 2013

Sinfully Easy Lindor Choc Cheesecake Cupcakes with Melty Centres

Last Christmas I somehow ended up with three boxes of Lindor chocolates; one of each of the white, milk and cookies & cream varieties to be precise. Now, I am most certainly NOT complaining as they are divine but, amidst all the other gazillions of truffles, mints, posh biscuits and other choccy treats myself and my family acquired between us during the festive season (there's still several boxes in the cupboard even now at the end of May, no joke) I thought I'd try and put some of them to use in my baking. Or rather, I thought I'd use the milk and white chocolate ones in my baking; the cookies & cream ones are such amazingly heavenly little balls of sweet, creamy loveliness that I have them stashed away in an undisclosed location for me to savour as they are too good even to share! Sorry. Not sorry. Anyway, one thing I found is that Lindor balls actually melt surprisingly well, even the white ones (provided you chop them up) so this uber decadent recipe really is sinfully easy.

Obviously if you don't want to splash out and use Lindor chocolates, these cakes would work fine with most other kinds, but I found them an unashamedly indulgent and sophisticated change to the bog-standard cooking chocolate taste, and you really can't beat Lindor for creaminess so they work fantastically in the gooey melty surprise centres.

I took a batch of these into work on my birthday back in January and they seemed to vanish in a puff of smoke - you can't go wrong with chocolate and cheesecake afterall, even when there are avid new year dieters about...


INGREDIENTS - makes approx. 12-15

For the cakes:
  • 4 oz self-raising flour
  • 4 oz caster sugar
  • 4 oz margarine/butter
  • 2 eggs
  • 2 oz cocoa powder
  • 1 tbsp strong instant coffee, diluted in hot water
  • 1/2 tsp baking powder
  • 1 tsp vanilla extract
For the melty filling/icing:
  • 5 (approx.) milk Lindor chocolates
  • 5 (approx.) white Lindor chocolates
  • 4 oz cream cheese (at room temperature, full-fat works best)

METHOD

For the cakes (inc. filling):
  1. Line a baking tray with 12 paper cake cases and boil the kettle.
  2. Whisk the margarine/butter together in a large mixing bowl until pale then whisk in the eggs.
  3. Fold in the flour, baking powder and vanilla extract until a batter of a soft dropping consistency has formed.
  4. Drop the mixture into half of the paper cases using a teaspoon until they're each about half full.
  5. Roughly chop two of the white Lindors into thirds using a sharp knife (and being careful not to ping them off the worktop...) and place a third on top of the mixture in each filled case, then top up each case with cake batter until they're about two thirds full.
  6. Stir a tablespoon of instant coffee into about two tablespoons of boiling water until the granules have all dissolved then pour into the remaining cake batter*. Then make a cup of tea with the leftover boiled water (well, it'd be wrong to put the kettle on and not have a cuppa, wouldn't it?!)
  7. Fold in the cocoa powder then drop the mixture into the remaining paper cases using a teaspoon until they're each about half full, then repeat step 5 but this time with two milk chocolate Lindors.
  8. Pop in the oven and bake at 180 degrees C for about 12-15 minutes until a cocktail stick inserted into the sponge comes out clean.
  9. When baked, place on a wire rack and leave to cool. At this stage the cakes can be frozen for decorating at a later date if you wish.

For the icing:
  1. Chop the remaining Lindors into small pieces and place the white chocolate ones into a heatproof bowl. Leave some of the flaky chocolate crumbs on the chopping board as these can be used to decorate the cakes at the end. 
  2. Place the bowl over a saucepan of hot water without letting the bottom touch the water and stir occasionally, or heat in short bursts of LOW heat in the microwave (this is important - don't put the white chocolate on a high heat for long periods or it will seize and turn lumpy and horrible), until completely melted.
  3. Place half of the cream cheese into a separate bowl and stir/whisk while pouring in the melted chocolate until a smooth, spreadable icing has formed. Work quickly as the chocolate will begin to set quite rapidly. If the mixture is excessively runny, add some icing sugar.
  4. Spread the icing onto the cooled vanilla cupcakes using a palette knife.
  5. Repeat steps 1 to 4 but this time with the milk chocolate Lindors and cupcakes.
  6. Sprinkle the remaining milk chocolate crumbs onto the white chocolate cakes and vice versa to decorate. Then grab one and devour it while you still can.
*Yes, this really does enhance the chocolatey flavour of the sponge, it's no myth! And I promise it won't make the cakes taste of coffee (this coming from a coffee hater, so trust me).

Friday 24 May 2013

Raspberry Ripple Ice Cream Cupcakes

Of all the recipes I've invented this is definitely one of my favourites; the results are not only delicious but just oh so pretty and pink :) And the swirly two-tone sponge looks fantastic! As soon as I discovered Morrisons raspberry ripple ice cream flavour squash I knew I had to find a way to combine it with a cupcake, and I'd been wanting to try out my mum's new duo piping bag (from Lakeland), so I managed to kill two birds with one stone here. I took some of them into work the other week and needless to say they didn't last long! I can imagine that kids would love them too.

Admittedly these cupcakes are a little 'synthetic' and if you don't have much of a sweet tooth they probably wouldn't be your cup of (non-sugary) tea but the tartness of the jam compliments the sweet icing perfectly...and hey, they're only little! Strawberry jam also works well if you don't have raspberry.


INGREDIENTS - makes approx. 12

For the cakes:
  • 4 oz self-raising flour
  • 4 oz caster sugar
  • 4 oz margarine/butter
  • 2 eggs
  • 1/2 tsp baking powder
  • 1 tsp vanilla extract
  • 2 tbsp Morrisons raspberry ripple ice cream flavour squash (not diluted)
  • Couple of drops red food colouring
For the filling/icing:
  • 6 tsp (approx.) raspberry jam
  • 10 oz icing sugar
  • 5 oz butter (unsalted if preferred)
  • 1/2 tsp vanilla extract
  • 1 tsp Morrisons raspberry ripple ice cream flavour squash (not diluted)
  • 1 tiny drop red food colouring
  • A few rainbow coloured sprinkles, to decorate

METHOD

For the cakes:
  1. Line a baking tray with 12 paper cake cases.
  2. Whisk the margarine/butter and sugar together in a large mixing bowl until pale then whisk in the eggs.
  3. Fold in the flour, baking powder, vanilla extract and raspberry ripple squash until a batter of soft dropping consistency has formed.
  4. Add a drop or two of red food colouring (no more than that, use it sparingly!) and swirl through the mixture a few times using a skewer. Don't overdo this or the batter will simply turn pink and you won't get the lovely marble effect!
  5. Drop the mixture into the paper cases using a teaspoon until they're each about two thirds full.
  6. Pop in the oven and bake at 180 degrees C for about 12-15 minutes until a cocktail stick inserted into the sponge comes out clean.
  7. When baked, place on a wire rack and leave to cool. At this stage the cakes can be frozen for decorating at a later date if you wish.
For the filling & icing:
  1. When they have cooled, use a teaspoon or small sharp knife to carefully cut out a hole (about 2cm in diameter and 1.5cm in depth) in the top of each cupcake, being careful not to cut too deep into the sponge. Don't discard the bits you've cut out!
  2. Drop about half a teaspoon of raspberry jam into each hole and gently push the sponge part that was cut out back into each one.
  3. Divide the butter, vanilla extract and raspberry ripple squash equally between two separate bowls and stir/whisk while gradually adding half of the icing sugar to each batch until a fairly stiff, fluffy mixture has formed. Add a tiny splash of red food colouring to one bowl and stir to turn the icing a pale pink - I find the best way to do this is to dip the end of a cocktail stick into the bottle of food colouring and then push it into the icing mixture to ensure it doesn't turn too red.
  4. Here, I used my mum's wonderful duo piping bag from Lakeland to top the cakes with swirly two-tone pink and white icing but I realise most people don't have one of these. It's possible to create a similar effect by adding alternating layers of the pink and white icing to a regular piping bag or, alternatively, you could simply spread the two lots of icing onto the cakes and randomly swirl together using a palette knife or teaspoon.
  5. Scatter a few rainbow sprinkles onto the top of each cake for extra ice creamy prettiness.

Sunday 19 May 2013

Low Sugar Chocolate Mud Icing

Unfortunately my dad has diabetes and is therefore unable to consume my myriad teeth-rottingly sweet baked goods in large quantities. The rest of my family are fairly health-conscious too so I came up with this delicious and simple alternative to sugary buttercream using just cream cheese and dark chocolate with a high cocoa content. I've called it 'mud' because of its colour and thick, chunky consistency! Obviously if you're topping standard vanilla or chocolate sponges with it they can hardly be classified as super healthy, and there's still quite a high fat content, but it does mean a small cupcake can be enjoyed with a bit less guilt if you're watching your sugar intake without going overboard with the artifical sweetener, and the strong flavour means a little goes a long way. Generally I'm not a fan of dark chocolate containing a high percentage of cocoa myself but the slight bitterness of the icing was offset really nicely with the light sponge, and the vanilla cereal stars make very cute decorations!

There are various reduced-sugar cake recipes available online that this could be paired with. Remember: the higher the cocoa content percentage, the less sugary the chocolate but the more bitter the taste.

DISCLAIMER: I'm not a health or nutrition expert so try at your own risk!

I ran out of icing when I made the cakes in the photo above so the three on the right have diabetic pineapple jam in instead :)

INGREDIENTS - to ice approx. 12 cupcakes
  • 2 oz high-cocoa chocolate (minimum 60%), roughly chopped
  • 5 oz cream cheese (at room temperature, full-fat works best)
  • Handful of vanilla flavour star-shaped cereal (available in Tesco last time I checked)
METHOD
  1. Melt the chocolate in a heatproof bowl over a saucepan of boiling water without letting the bottom of the bowl touch the water and stir occasionally, or place in the microwave and blast on low heat in short bursts until completely melted.
  2. Place the cream cheese in a separate bowl and gradually pour in the melted chocolate while stirring until a smooth, spreadable mixture has formed.
  3. Spread the icing onto each cupcake using a palette knife - make sure you work quickly as it sets very rapidly - then top with a few vanilla cereal stars if desired.
Edit: Here are some I made for my dad for Father's Day, topped with crushed sugar-free Werther's Originals :)


Saturday 18 May 2013

Cheat's Creme Brulee Cupcakes

I adore a good creme brulee so I leapt at the chance of transforming this silky, creamy dessert into a cupcake. However, after much Googling and continuously seeing the words 'separate egg yolks' and 'blow torch' I immediately decided they were too much effort. Because I'm lazy like that.

I then stumbled across an American recipe where the cupcakes were filled with vanilla flavour 'pudding' which sounded like minimal faff but, sadly, what the Americans refer to as 'pudding' (a kind of creamy dessert usually served in individual pots if I remember rightly from watching Scrubs) is not widely available here in the UK. Luckily I discovered the perfect substitute in the form of vanilla flavour Alpro soya dessert! This can be bought as a pack of four individual pots from most major supermarkets and can usually be found among the gluten/dairy-free products (they're also available in dark chocolate, milk chocolate and toffee which are all yummy too, just FYI). I decided to take the plunge and attempt some spun sugar decorations (actually not as scary as they sound) for an authentically crisp but refreshingly blowtorch-free creme brulee-esque topping. Rounded off with a simple vanilla buttercream icing, these little beauties went down a treat, with many 'ooh's of admiration :) And they're so ridiculously easy to make!

You'll only need to use a small amount of the soya dessert for the cakes but any that's left over is delicious poured over sponge puddings, brownies, other warm desserts etc as a tasty alternative to custard (or of course you could just eat it straight out the pot if you haven't fallen into a sugar coma brought on by sampling icing like me...)


INGREDIENTS - makes approx. 12

For the cakes:
  • 4 oz self-raising flour
  • 4 oz caster sugar
  • 4 oz margarine/butter
  • 2 eggs
  • 1/2 tsp baking powder
  • 1 tsp vanilla extract
For the filling/icing/spun sugar decorations:
  • 12 tsp (approx.) vanilla flavour Alpro soya dessert
  • 5 oz icing sugar
  • 2 oz butter (unsalted if preferred)
  • 1/2 tsp vanilla extract
  • 2 oz caster sugar
METHOD

For the cakes:
  1. Line a baking tray with 12 paper cake cases.
  2. Whisk the margarine/butter and sugar together in a large mixing bowl until pale then whisk in the eggs.
  3. Fold in the flour, baking powder and vanilla extract until batter of a soft dropping consistency has formed.
  4. Drop the mixture into the paper cases using a teaspoon until they're each about two thirds full.
  5. Pop in the oven and bake at 180 degrees C for about 12-15 minutes until a cocktail stick inserted into the sponge comes out clean.
  6. When baked,  place on a wire rack and leave to cool. At this stage the cakes can be frozen for decorating at a later date if you wish.
For the filling, icing & spun sugar decorations:
  1. When they have cooled, use a teaspoon or small sharp knife to carefully cut out a hole (about 2cm in diameter and 1.5cm in depth) in the top of each cupcake, being careful not to cut too deep into the sponge. Don't discard the sponge bits you've cut out!
  2. Put about a teaspoon of the vanilla soya dessert into each hole and gently push the sponge part that was cut out back into each one.
  3. Add the caster sugar to a small pan over LOW heat until it has turned brown and melted to a thick, sticky consistency - DO NOT STIR! Be patient and don't be tempted to turn up the heat to speed up the process as it will burn horribly, trust me!
  4. When all the granules have disappeared, scoop the melted sugar out of the pan using a spatula and spread onto baking parchment or the opened-out clean inside of a cereal packet (sounds odd but works really well for this kind of thing, and it's always good to recycle!) Do this quickly as the sugar will begin to set rapidly.
  5. While you're waiting for the spun sugar to cool and set, place the butter and vanilla extract into a bowl and stir/whisk while gradually adding the icing sugar until a thick, fluffy mixture has formed.
  6. Spoon the icing into a piping bag with a nozzle of your choice attached (I used a large circle one) and squeeze onto the top of each cake, or simply spread the icing on using a palette knife.
  7. Break up your sheet of spun sugar into randomly sized shards and place some on top of each cake just before serving. Any leftover shards can be stored in an airtight container for about a week or so.

Butterscotch Schnapps Cupcakes

Most of my baking incorporates a special 'secret' ingredient which serves as the source of inspiration and these little golden stunners are no exception. They contain one of my favourite ingredients for all kinds of cooking and baking, butterscotch Mickey Finn's - a dreamy discovery I made in a corner shop in Princes Risborough. Unlike the garishly green sour apple Mickey Finn's I remember downing by the bucketful in my student days (which always made me think of toxic waste), this has a lovely warm creamy vanilla taste and no nasty afterburn. It makes a fantastic addition to cakes and is also scrummy added to whipped cream, coffee, Coca Cola or simply drizzled over sponge pudding or brownies; the possibilities are endless! It's just a shame it's not very widely available in the UK. 

Following a failed first attempt and after looking at lots of different butterscotch cupcake recipes online, I decided on the addition of Angel Delight and cream soda in both the sponge and icing to complete the recipe - the result is a deliciously moist and moreish cake! If you're teetotal or aren't able to find the Mickey Finn's, the recipe is still delicious without it.

WARNING: Due to (I think) the alcohol content you may find the cakes fall slightly after they're removed from the oven - I managed to improve this a bit after altering the mixture a couple of times to the method below but the results were by no means perfect. So they may not be the most aesthetically-pleasing cupcakes, but the sponge is still super moist and tasty and it's not that noticeable once they've been iced!


INGREDIENTS - makes approx. 12-15

For the cakes:
  • 5 oz self-raising flour
  • 4 oz caster sugar
  • 4 oz margarine/butter
  • 2 eggs
  • 1/2 tsp baking powder
  • 1 tbsp butterscotch Mickey Finn's (or other brand of butterscotch schnapps)
  • 3/4 packet butterscotch flavour Angel Delight
  • 1 tsp vanilla extract
  • 1 tbsp cream soda
For the icing:
  • 10 oz icing sugar
  • 5 oz butter (unsalted if preferred)
  • 1 tsp butterscotch Mickey Finn's
  • 1 tsp cream soda
  • 1/4 packet butterscotch flavour Angel Delight
  • Sprinkling brown sugar, to decorate

METHOD

For the cakes:
  1. Line a baking tray with 12-15 paper cake cases.
  2. Whisk the margarine/butter and sugar together in a large mixing bowl until pale then whisk in the eggs.
  3. Fold in the flour, baking powder, Mickey Finn's, cream soda, vanilla extract and 3/4 of the Angel Delight until batter of a soft dropping consistency has formed. Add a little extra flour if excessively runny.
  4. Drop the mixture into the paper cases using a teaspoon until they're each about two thirds full.
  5. Pop in the oven and bake at 180 degrees C for about 12-15 minutes until a cocktail stick inserted into the sponge comes out clean.
  6. When baked,  place on a wire rack and leave to cool. At this stage the cakes can be frozen for decorating at a later date if you wish.
For the icing:
  1. Place the butter, Mickey Finn's, cream soda and the remaining 1/4 of the Angel Delight into a bowl and stir/whisk thoroughly while gradually adding the icing sugar until a fairly stiff mixture has formed. It's usually best to play this bit by ear - if too runny, add more icing sugar or if too stiff, add a splash more cream soda.
  2. Spoon the icing into a piping bag with an attached nozzle of your choice (I used a rope effect one) and pipe onto the cooled cakes or simply spread it on using a palette knife, then sprinkle with a little brown sugar. And scoff! Yum.
Edit: I used the same recipe to make a larger layer cake as a commission for a lady at work - she was very impressed!